Train and deploy fine-tuned GPT-2 model using PyTorch on Amazon SageMaker to classify news articles

Photo by Patrick Tomasso on Unsplash
Table of Contents
- Table of Contents
- 1. Introduction
- 2. System Requirements
- 3. Dataset
- 4. Demo
- 5. Training and deployment of GPT-2 on SageMaker
- 6. Training in Colab Notebook
- 7. Deployment using Amazon EC2 and Docker
- 8. Summary
- 9. References
- Contact
Text classification is a very common task in NLP. It can be used in many applications from spam filtering, sentiment analysis to customer support automation and news categorization. Using Deep Learning language models for large-scale text classification tasks has become quite popular in the industry recently, especially so with the emergence of Transformers in recent years. Because the size of these Transformer models are often too large to train on local machines, cloud computing platforms (e.g. GCP, AWS, Azure, Alibabacloud) are commonly used. Therefore in this blog, I want to demonstrate how to train and deploy a fine-tuned GPT-2 model for text classification tasks using Amazon SageMaker.
(This article was also published on Towards Data Science.)
1. Introduction
1.1 Transformers: GPT-2 vs BERT
GPT-2 belongs to a family of deep learning models called “Transformers”. Transformers are the building block of the current state-of-the-art NLP architecture. It is impossible to explain how transformers work in one paragraph here, but to sum it up, transformers uses a “self-attention” mechanism that computes a representation of a sequence by “learning” the relationship between words at different positions in a sentence. A typical transformers design contains two parts, encoder and decoders, both working as vectorized representation of word relationships.
![]()
Image by Jay Alammar on "The Illustrated Transformer"
GPT-2 and BERT are two well-known transformer models released in 2018 and 2019, respectively. There are newer and better models released since then (for example, RoBERTa in 2019 and GPT-3 in 2020), however, these two still remain very popular with a lot of industrial applications till now, due to their great usability and performance. The key difference between GPT-2 and BERT is that GPT-2 in its nature is a generative model while BERT isn’t. That’s why you can find a lot of tech blogs using BERT for text classification tasks and GPT-2 for text-generation tasks, but not much on using GPT-2 for text classification tasks. That’s why I decided to use GPT-2 here - it’s more challenging!
1.2 Amazon SageMaker
Amazon SageMaker is a great tool to train and deploy deep learning models on cloud instances with a fully-managed infrastructure provided by AWS. Within minutes, you can build, train and deploy a model in a Jupyter Notebook and don’t have to worry about environment setup, because it comes with many pre-built Conda environments and Docker containers. It’s a huge life-saver for data scientists like me.
It’s worth mentioning that SageMaker can also be used for Streamlit app development. This is very useful for product prototyping, because right after model training, you can directly build an app on the same instance. You will see that in this article.
2. System Requirements
Since most of the model training and deployment will be on AWS, there aren’t any system requirements for your local machine. Here is all you need:
- an AWS account (sign up here)
- a Google Drive account (optional, for training on Colab Notebook)
- a local bash/zsh terminal (optional, for Streamlit app deployment)
3. Dataset
The dataset we are going to use in this project is the BBC News Classification dataset with a public license. You can download the dataset from Kaggle.
This dataset is in CSV format and it has two columns: text and category. It contains 2226 different texts, each labelled under one of 5 categories: entertainment, sport, tech, business, or politics.

Image by Author
4. Demo
I built an Online News Classifier using Streamlit running the trained model. You can input or paste any news here, and it will generate predictions of the news category with great accuracy. As simple as this app may looks, underneath it runs a very powerful deep learning model!
Check it out here: GPT-2 News Classifier.
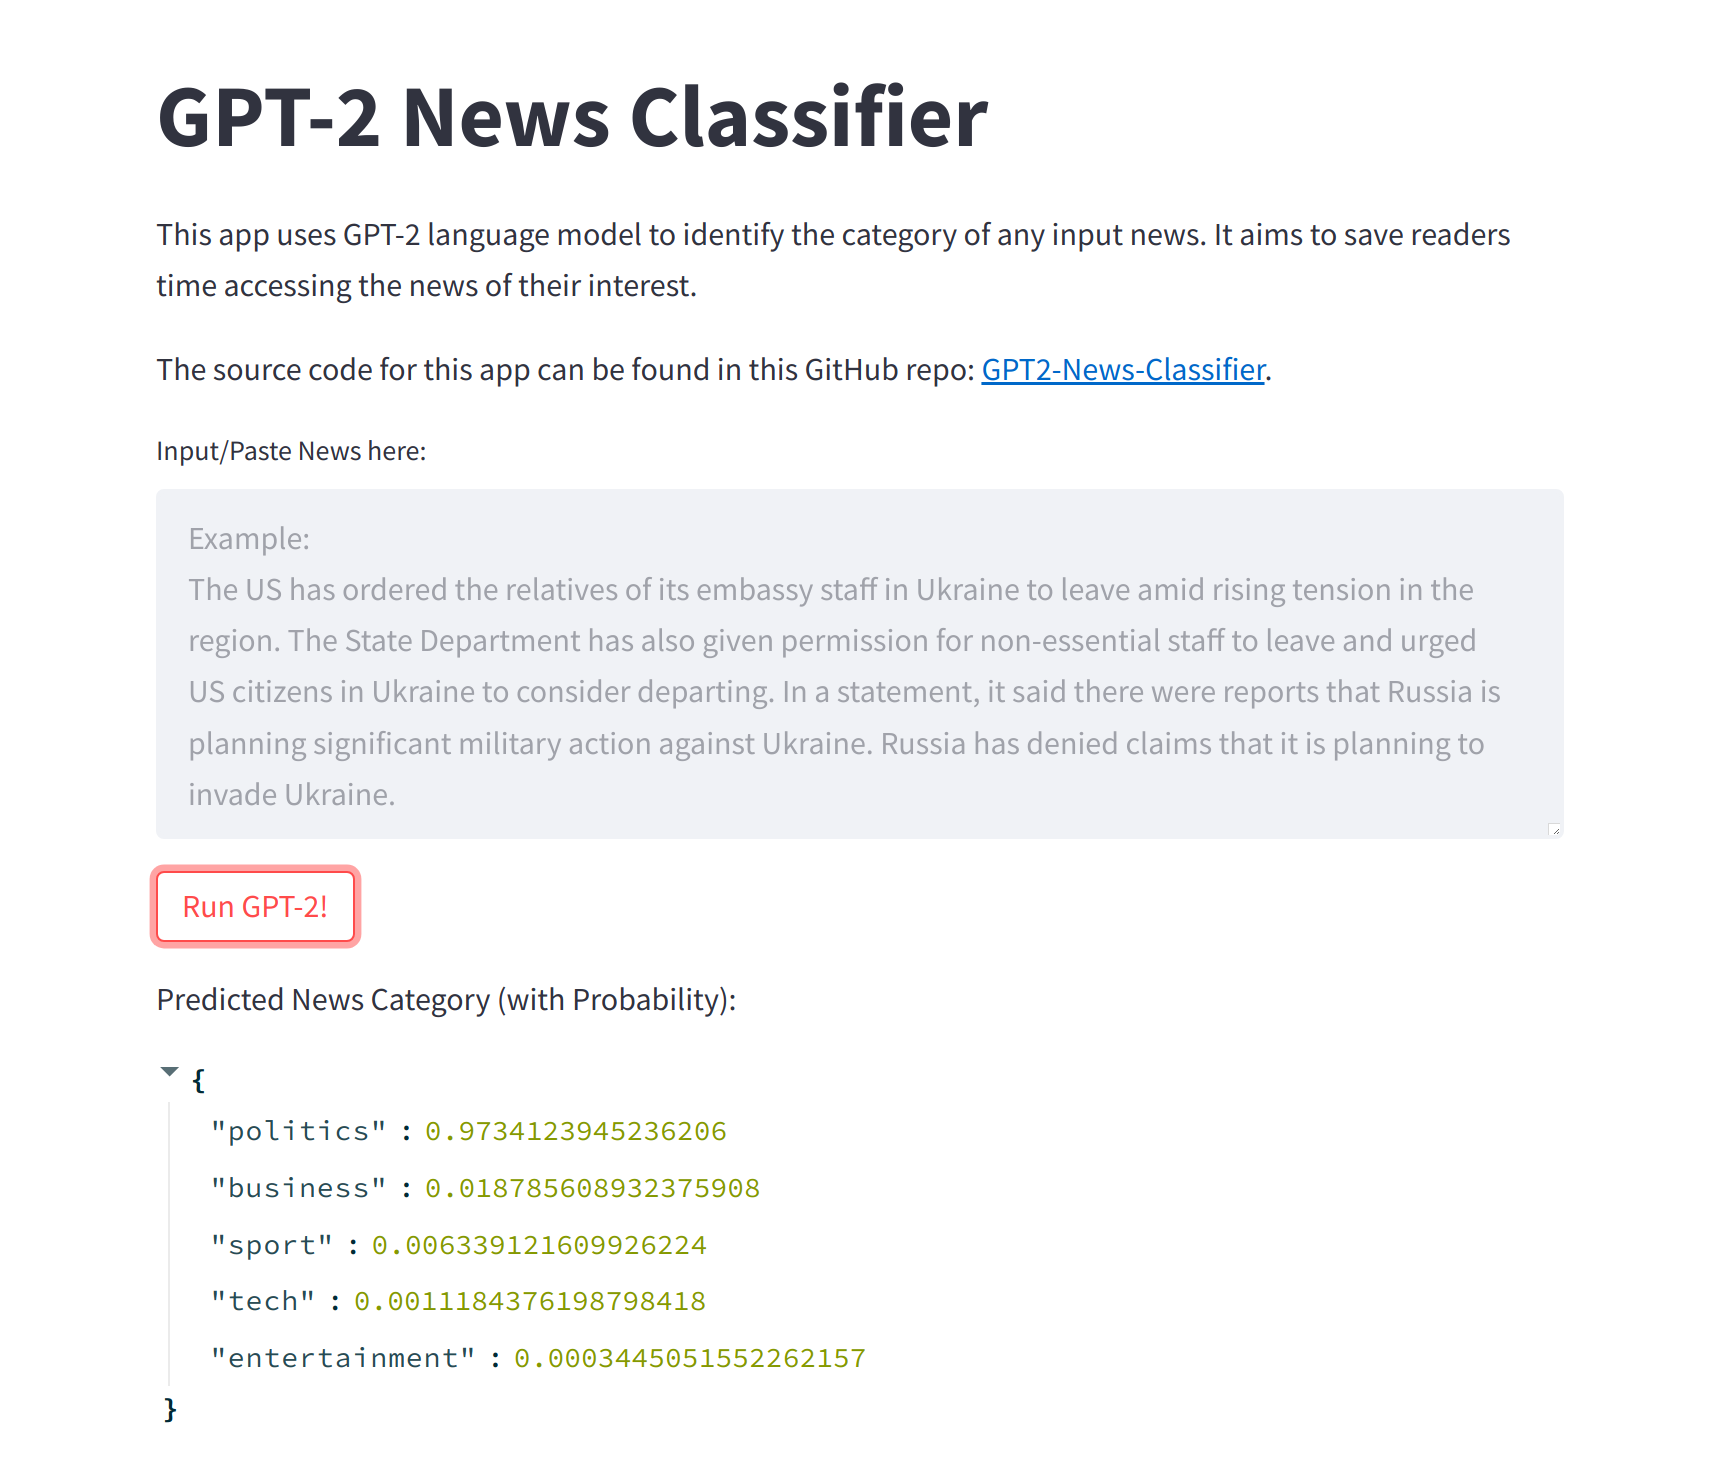
Image by Author
5. Training and deployment of GPT-2 on SageMaker
5.1. Create an Amazon SageMaker notebook instance
Follow this hands-on tutorial from AWS to create an Amazon SageMaker notebook instance. Use “gpt2-news-classifier” as the instance name, and “ml.t2.medium” as the instance type.
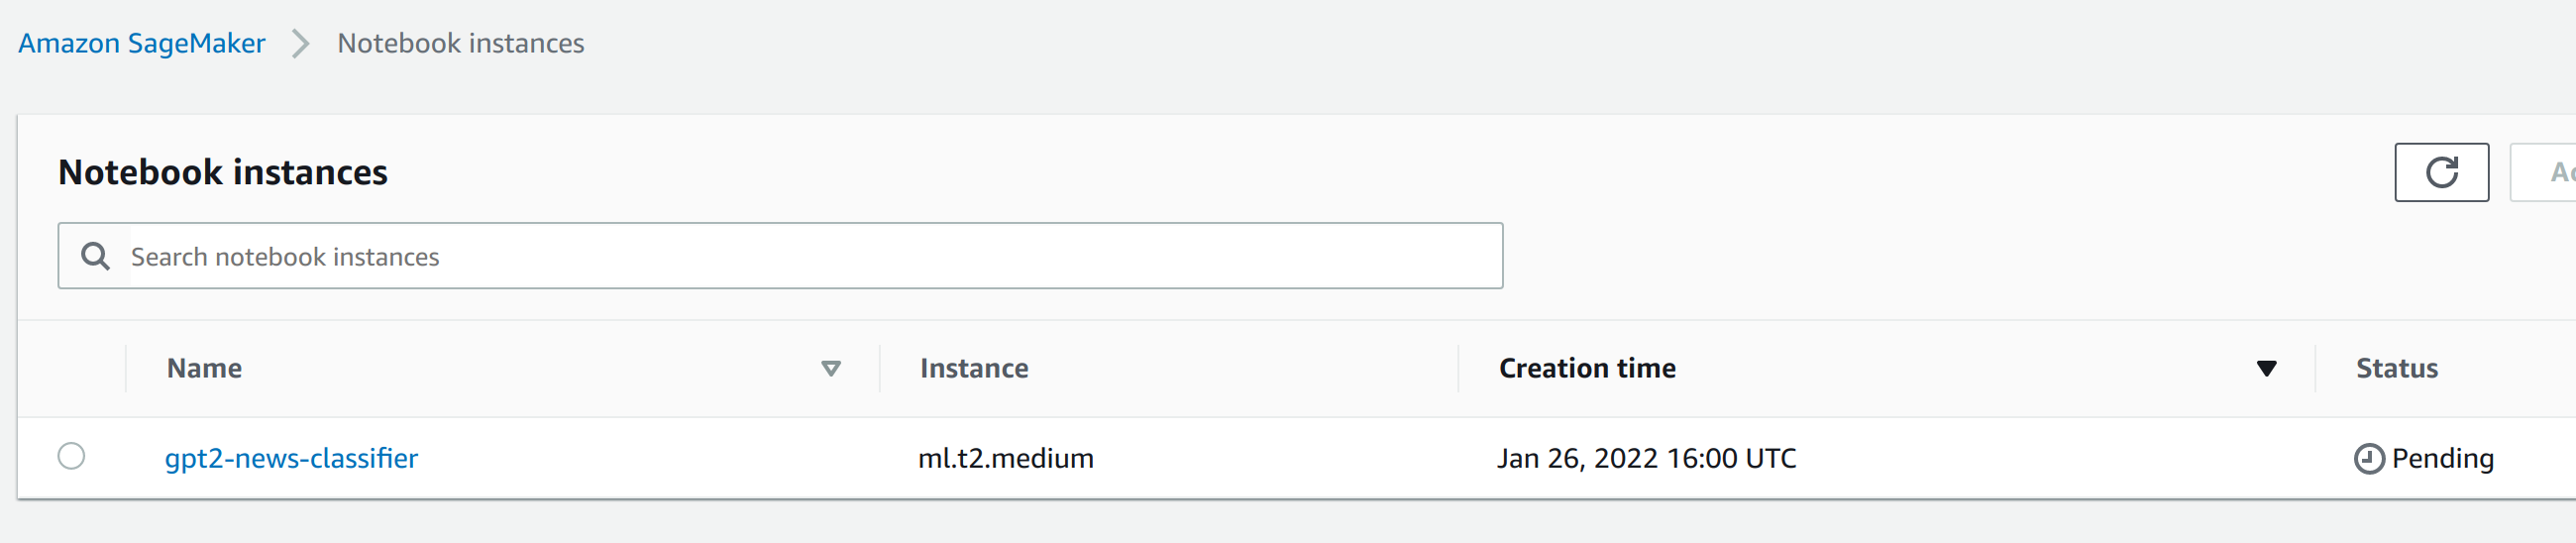
Image by Author
5.2. Training and deployment
When notebook’s status changes to InService, choose Open Jupyter, and Upload all files from this Git folder with following structure:
├── gpt2-news-classifier-sagemaker-train-deploy.ipynb   # main notebook
├── utils.py               # utility functions used by main notebook
├── code                   # separate PyTorch script folder
│   ├── requirements.txt   # libraries used by train_deploy.py
│   └── train_deploy.py    # PyTorch training/deployment script
├── data                   # data folder to be uploaded to S3 bucket
│   ├── test               # test data
│   │   └── test.csv
│   ├── train              # train data
│   │   └── train.csv
│   └── val                # validation data
│       └── val.csv
└── streamlit_app          # Streamlit app folder
    ├── Dockerfile         # Dockerfile for the app (container)
    ├── requirements.txt   # libraries used by app.py
    └── src
        └── app.py         # main code for the Streamlit app
Run this notebook on SageMaker to train and deploy the GPT-2 model. Read through it to get more details on the implementation.
5.3. train_deploy.py
Since we are building and training a PyTorch model in this project, it is recommended by SageMaker Python SDK to prepare a separate train_deploy.py script to construct and store model functions used by SageMaker. There are two essential functions, SimpleGPT2SequenceClassifier and train.
The SimpleGPT2SequenceClassifier class in train_deploy.py is responsible for building a classifier on top of a pre-trained GPT-2 model. The trick here is to add a linear layer on top of GPT-2’s 12 layers of decoders with its output dimension equals our number of labels. In this way we can use GPT-2 to output 5 numbers which corresponds to our five news categories!
class SimpleGPT2SequenceClassifier(nn.Module):
    def __init__(self, hidden_size: int, num_classes:int ,max_seq_len:int, gpt_model_name:str):
        super(SimpleGPT2SequenceClassifier,self).__init__()
        self.gpt2model = GPT2Model.from_pretrained(gpt_model_name)
        self.fc1 = nn.Linear(hidden_size*max_seq_len, num_classes)

    def forward(self, input_id, mask):
        """
        Args:
                input_id: encoded inputs ids of sent.
        """
        gpt_out, _ = self.gpt2model(input_ids=input_id, attention_mask=mask, return_dict=False)
        batch_size = gpt_out.shape[0]
        linear_output = self.fc1(gpt_out.view(batch_size,-1))
        return linear_output
The train function in train_deploy.py constructs a training loop of the classifier given input data.
def train(args):
    # set up GPU training (if using GPU)
    use_cuda = args.num_gpus > 0
    logger.debug("Number of gpus available - {}".format(args.num_gpus))
    kwargs = {"num_workers": 1, "pin_memory": True} if use_cuda else {}
    device = torch.device("cuda" if use_cuda else "cpu")

    # set the seed for generating random numbers
    torch.manual_seed(args.seed)
    if use_cuda:
        torch.cuda.manual_seed(args.seed)

    # load train, validation and test data
    train_loader = _get_train_data_loader(args.batch_size, args.train_dir, **kwargs)
    val_loader = _get_val_data_loader(args.batch_size, args.val_dir, **kwargs)
    test_loader = _get_test_data_loader(args.batch_size, args.test_dir, **kwargs)

    # print logging info
    logger.debug(
        "Processes {}/{} ({:.0f}%) of train data".format(
            len(train_loader.sampler),
            len(train_loader.dataset),
            100.0 * len(train_loader.sampler) / len(train_loader.dataset),
        )
    )

    logger.debug(
        "Processes {}/{} ({:.0f}%) of val data".format(
            len(val_loader.sampler),
            len(val_loader.dataset),
            100.0 * len(val_loader.sampler) / len(val_loader.dataset),
        )
    )

    logger.debug(
        "Processes {}/{} ({:.0f}%) of test data".format(
            len(test_loader.sampler),
            len(test_loader.dataset),
            100.0 * len(test_loader.sampler) / len(test_loader.dataset),
        )
    )

    # initialize model and parameters
    model = SimpleGPT2SequenceClassifier(hidden_size=args.hidden_size, num_classes=5, max_seq_len=args.max_seq_len, gpt_model_name="gpt2").to(device)
    EPOCHS = args.epochs
    LR = args.lr

    # use cross-entropy as the loss function
    criterion = nn.CrossEntropyLoss()

    # use Adam as the optimizer
    optimizer = Adam(model.parameters(), lr=LR)

    # enable GPU training (if using GPU)
    if use_cuda:
        model = model.cuda()
        criterion = criterion.cuda()

    # training loop
    for epoch_num in range(EPOCHS):
        total_acc_train = 0
        total_loss_train = 0

        for train_input, train_label in tqdm(train_loader):
            train_label = train_label.to(device)
            mask = train_input['attention_mask'].to(device)
            input_id = train_input["input_ids"].squeeze(1).to(device)

            model.zero_grad()

            output = model(input_id, mask)

            batch_loss = criterion(output, train_label)
            total_loss_train += batch_loss.item()

            acc = (output.argmax(dim=1)==train_label).sum().item()
            total_acc_train += acc

            batch_loss.backward()
            optimizer.step()

        total_acc_val = 0
        total_loss_val = 0

        # validate model on validation data
        with torch.no_grad():
            for val_input, val_label in val_loader:
                val_label = val_label.to(device)
                mask = val_input['attention_mask'].to(device)
                input_id = val_input['input_ids'].squeeze(1).to(device)

                output = model(input_id, mask)

                batch_loss = criterion(output, val_label)
                total_loss_val += batch_loss.item()

                acc = (output.argmax(dim=1)==val_label).sum().item()
                total_acc_val += acc

            logger.info(
            f"Epochs: {epoch_num + 1} | Train Loss: {total_loss_train/len(train_loader): .3f} \
            | Train Accuracy: {total_acc_train / len(train_loader.dataset): .3f} \
            | Val Loss: {total_loss_val / len(val_loader.dataset): .3f} \
            | Val Accuracy: {total_acc_val / len(val_loader.dataset): .3f}")

    # evaluate model performance on unseen data
    test(model, test_loader, device)

    # save model
    save_model(model, args.model_dir)
One important note: GPT-2 is a text generative model which its last token embedding to predict subsequent tokens. Therefore unlike BERT which uses its first token embedding, in the tokenization step of input text here, we should use the last token as below. (George Mihaila provided an elegant way of doing this in his article “GPT2 For Text Classification using Hugging Face Transformers”, which is what I am using here.)
# set up GPT2Tokenizer
logger.info('Loading GPT2Tokenizer.')
tokenizer = GPT2Tokenizer.from_pretrained('gpt2')
tokenizer.padding_side = "left"
tokenizer.pad_token = tokenizer.eos_token
6. Training in Colab Notebook
When it comes to training Deep Learning models on a cloud notebook, a convenient alternative to Amazon SageMaker is Google’s Colab Notebook. It skips all cloud service setup as you need in AWS, and best of all, it offers free CPU/GPU instances for model training (comes with 12 hour limit though)! To use it, simply open your Google Drive, choose New->More->Google Colaboratory. If you want to use GPU to speed up the training, choose Runtime->Change runtime type->GPU, and you can write your code there!
My Colab Notebook as well as the data can be found here.
7. Deployment using Amazon EC2 and Docker
Although model deployment can be done within a SageMaker Notebook Instance as I have just shown, in real application development practice it is often recommended to decouple training and deployment for simplicity and reproducibility. Therefore, I also deployed our trained GPT-2 model using Docker on Amazon EC2 instance.
7.1. Create an Amazon EC2 instance
Follow this tutorial from AWS to create and launch an Amazon EC2 instance. A few customized settings for this project:
- In Step 1: Choose an Amazon Machine Image (AMI), choose the Deep Learning AMI (Ubuntu) AMI. Using this image does introduce a bit of extra overhead, however, it guarantees us that git and Docker will be pre-installed which saves a lot of trouble.
- In Step 2: Choose an Instance Type, choose t2.large to ensure we have enough space to build and run our Docker image.
- In Step 6: Configure Security Group, choose Add Rule and create a custom tcp rule for port 8501 to make our streamlit app publicly available.
- After clicking Launch, choose Create a new key pair, input “ec2-gpt2-streamlit-app”, and click “Download Key Pair” to save
ec2-gpt2-streamlit-app.pemkey pair locally.
7.2. Running Docker container in cloud
After launching the EC2 instance, use SSH to connect to the instance:
ssh -i ec2-gpt2-streamlit-app.pem ubuntu@your-instance-DNS-address.us-east-1.compute.amazonaws.com
Then, copy my code into the cloud using git:
git clone https://github.com/haocai1992/GPT2-News-Classifier.git
Afterwards, go into the ec2-docker-deploy folder to build and run the image:
cd ec2-docker-deploy/
docker image build -t streamlit:gpt2-news-classifier-app .
docker container run -p 8501:8501 -d streamlit:gpt2-news-classifier-app
Now, you can access the Streamlit app at http://<EC2 public IP address>:8501(EC2 public IP address can be found under “IPv4 Public IP” in the AWS console)!
8. Summary
I hope you can learn from this article that it’s not complicated at all to train and deploy an Deep Learning model using Amazon SageMaker. In any case, there are even simpler alternatives, such as Google Colab training and Amazon EC2 deployment. Hope you found this post useful.
All source code can be found in this Github Repo: https://github.com/haocai1992/GPT2-News-Classifier
9. References
- Feature image: Photo by Patrick Tomasso on Unsplash. https://unsplash.com/photos/BQTHOGNHo08.
- Transformers: Alammar, J (2018). The Illustrated Transformer [Blog post]. Retrieved from https://jalammar.github.io/illustrated-transformer/
- GPT-2 vs BERT: https://judithvanstegeren.com/blog/2020/GPT2-and-BERT-a-comparison.html
- BBC News Classification dataset: D. Greene and P. Cunningham. “Practical Solutions to the Problem of Diagonal Dominance in Kernel Document Clustering”, Proc. ICML 2006.
- GPT-2 for text classification: https://github.com/huggingface/transformers/issues/3168
- GPT2 For Text Classification using Hugging Face 🤗 Transformers (by George Mihaila): https://gmihaila.medium.com/gpt2-for-text-classification-using-hugging-face-transformers-574555451832
- Train and deploy models on AWS SageMaker: https://medium.com/@thom.e.lane/streamlit-on-aws-a-fully-featured-solution-for-streamlit-deployments-ba32a81c7460
- Deploy Streamlit app on AWS EC2: https://medium.com/usf-msds/deploying-web-app-with-streamlit-docker-and-aws-72b0d4dbcf77
Contact
- Author: Hao Cai
- Email: haocai3@gmail.com
- Github: https://github.com/haocai1992
- Linkedin: https://www.linkedin.com/in/haocai1992/