How to set up your environment for Spark
Table of Contents
- Table of Contents
- Installation
- Configuration
Spark is a very popular open-source big data framework that is being used by many companies in the industry. Here I want to show you how to set up Spark environment in a Linux machine (I am using Ubuntu 20.04.3).
(This article was also published on Towards AI.)
Installation
Here is the list of things we need to install:
- JDK
- IDEA
- Scala
- Spark
- PySpark (optional)
- Hadoop
1. JDK
JDK is short for Java Development Kit, the development environment for Java. Spark is written in Scala, a language that is very similar to Java and also runs on JVM (Java Virtual Machine), so we need to install JDK first. Here I installed JDK 11.0.13.
To install JDK, run:
$ sudo apt install default-jre
Next, check if the installation is done:
$ java -version
It should output the following:
openjdk version "11.0.13" 2021-10-19
OpenJDK Runtime Environment (build 11.0.13+8-Ubuntu-0ubuntu1.20.04)
OpenJDK 64-Bit Server VM (build 11.0.13+8-Ubuntu-0ubuntu1.20.04, mixed mode, sharing)
2. IDEA
IntelliJ IDEA is the most popular IDE for Java/Scala. We need it for writing and running code.
Download and install the latest version of IDEA here: https://www.jetbrains.com/idea/download/#section=linux. I selected the free community version.
3. Scala
Scala is the language that is commonly used to write Spark programs (along with Python!). If you want to learn how to code in Scala, I highly recommend this course: https://www.coursera.org/specializations/scala. If you don’t know Scala, you can use Python, but install Scala anyway!
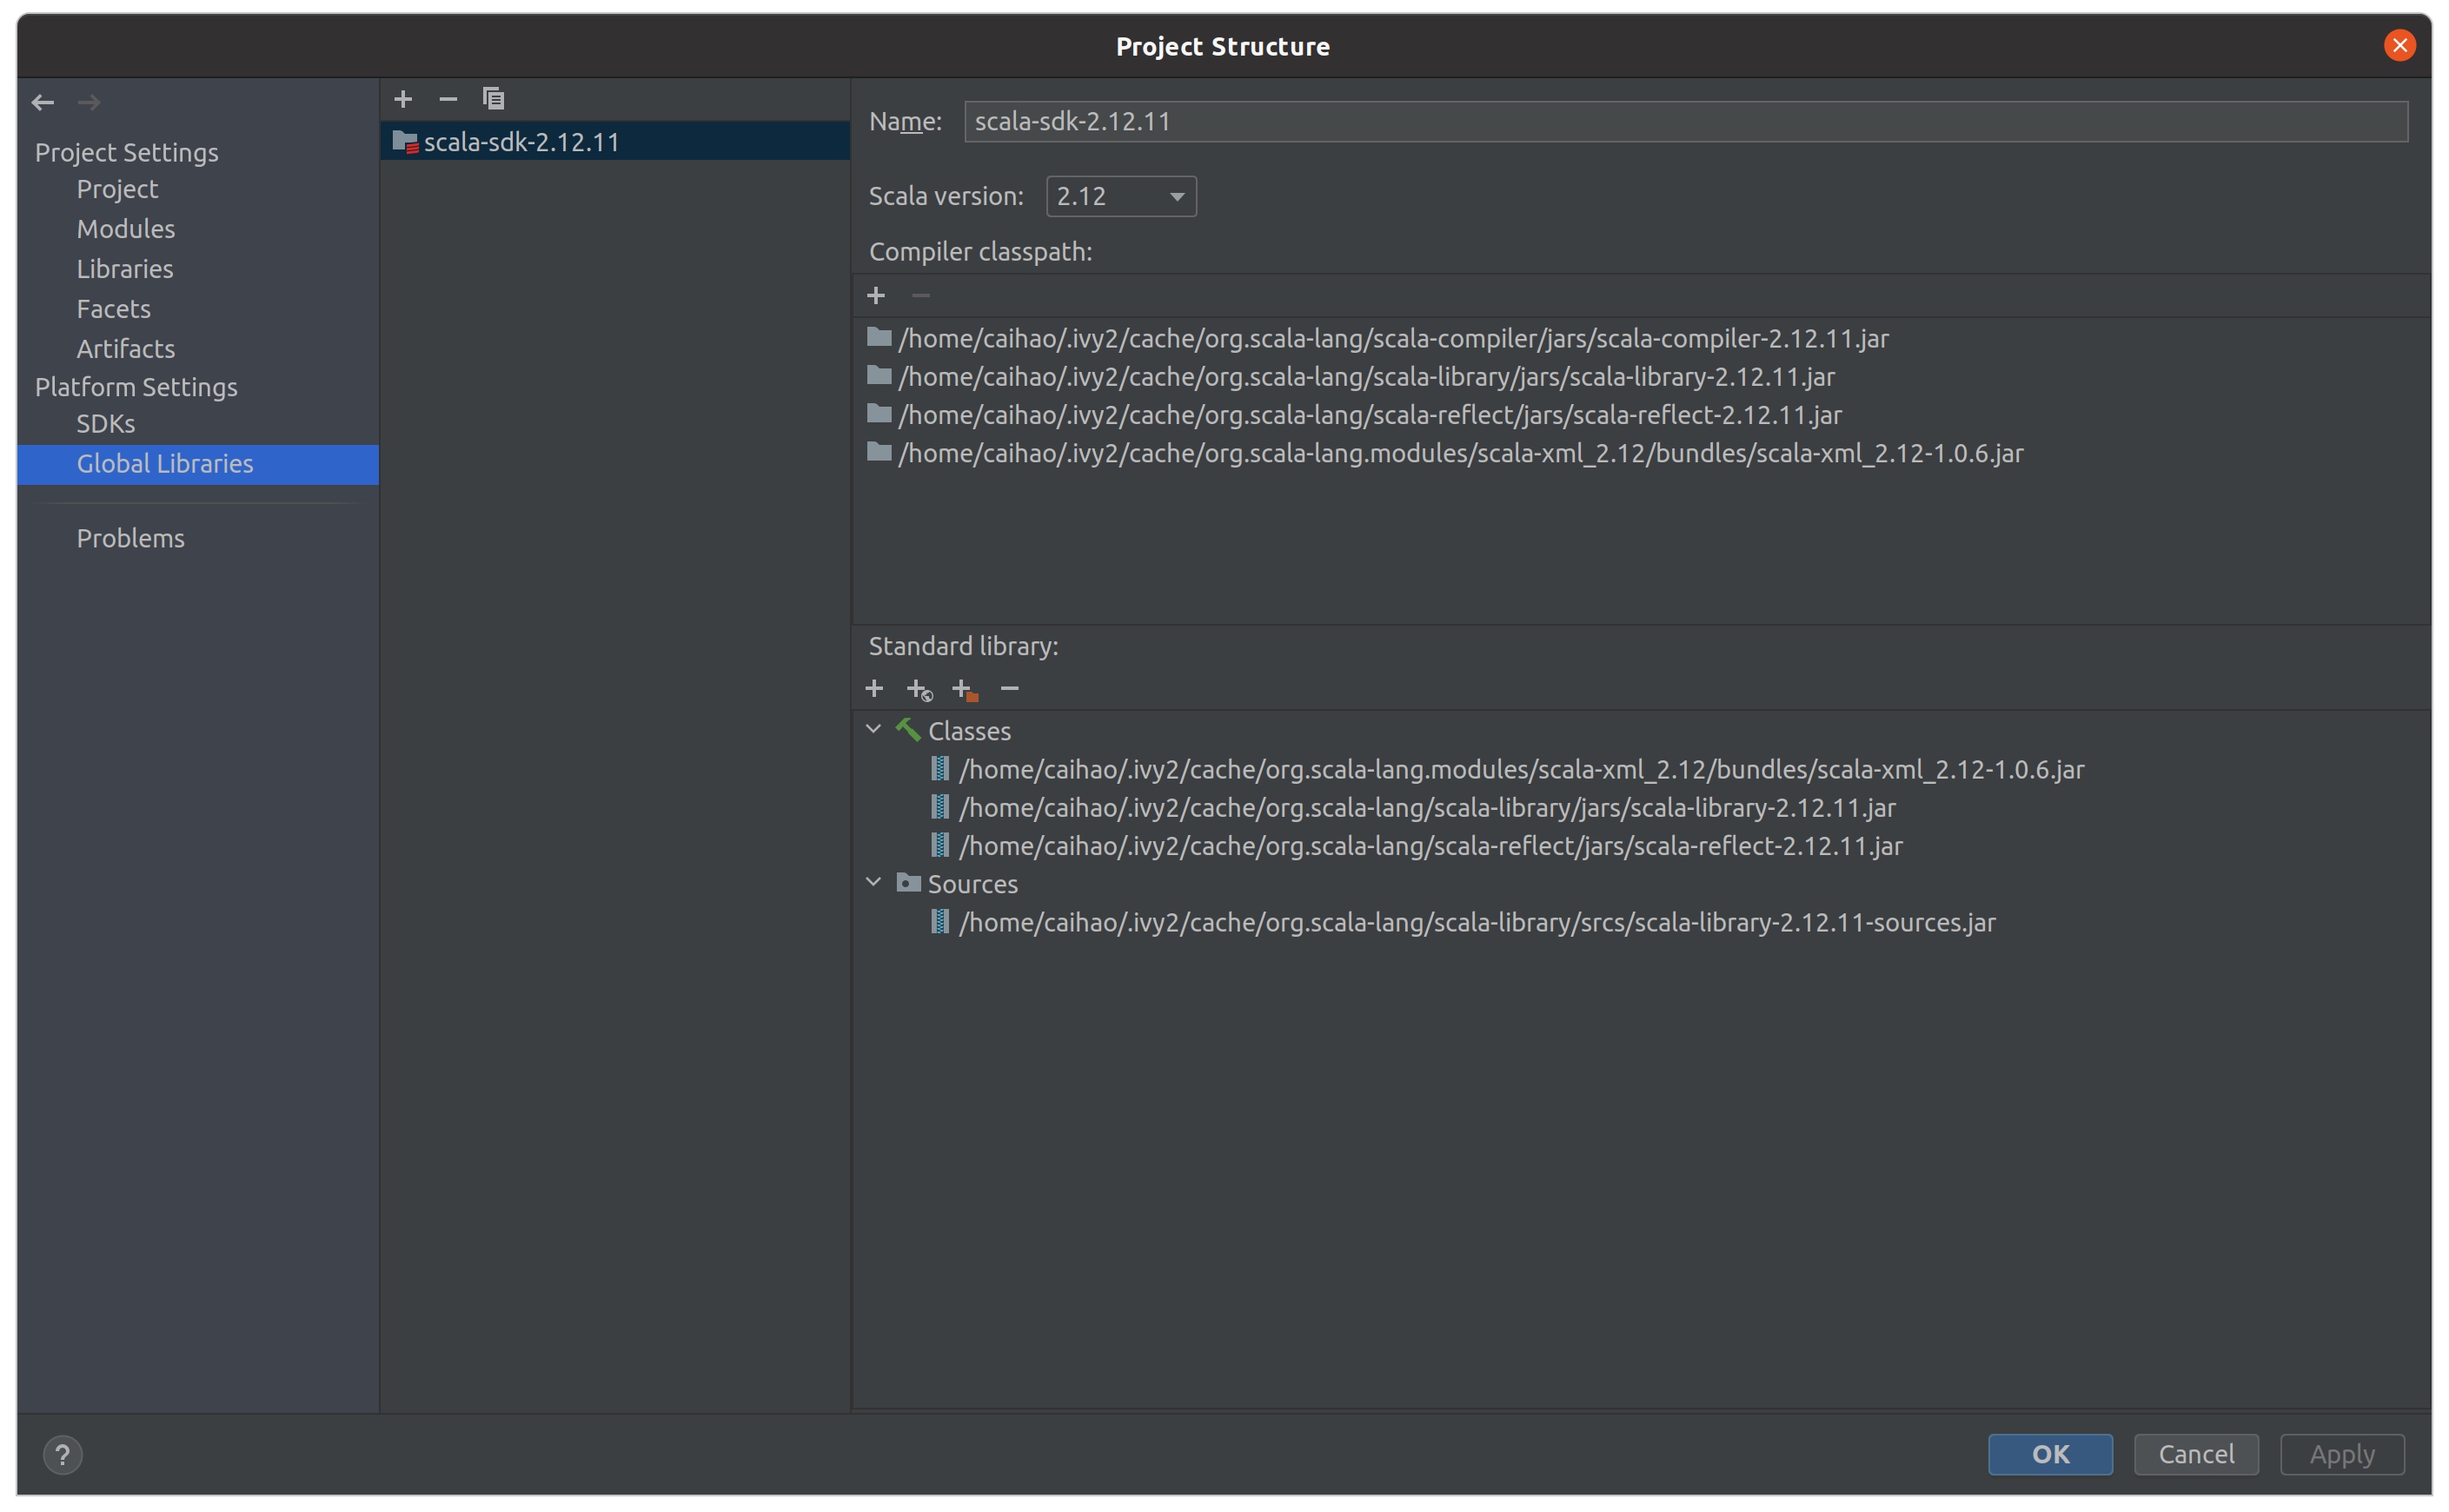
Download Scala here: https://www.scala-lang.org/download/scala2.html. You can either select “Download the Scala binaries for unix” and unpack the binaries locally, or install Scala using IDEA by selecting “Getting Started with Scala in IntelliJ”. I did the latter and installed Scala 2.12.11 in my machine.
4. Spark
Download Spark here: https://spark.apache.org/downloads.html. Here I selected the latest release (3.2.0) pre-built for Apache Hadoop 3.3.
Then unpack the package and move it to your preferred folder:
$ tar -zxvf spark-3.2.0-bin-hadoop3.2.tgz
$ mv spark-3.2.0-bin-hadoop3.2 /opt/spark
Then you need to modify your bash configuration file (~/.bashrc or ~/.bash_profile or ~/.zshrc) and add Spark to your PATH:
export SPARK_HOME=/opt/spark
export PATH=$PATH:$SPARK_HOME/bin:$SPARK_HOME/sbin
Finally you need to run the configuration file again to make it work:
$ source ~/.bashrc
Now you can run Spark in your machine! Go to /opt/spark/bin/ and run:
$ ./spark-shell
If you see the below result, it means you’re all set for Spark!

5. PySpark (optional)
In a nutshell, PySpark is the Python version of Spark. You can write Spark code in Python-style with PySpark without having to learn Scala. To install PySpark use PyPI, run:
$ pip install pyspark
6. Hadoop
Hadoop is the “previous generation” of big data framework before Spark. As awesome as Spark is, it was actually built on top of Hadoop in a sense and still relies on components from Hadoop. More details on their relationship can be found in this article. Here, I want to run Spark jobs on a Hadoop cluster and use YARN (Hadoop’s resource management and scheduling tool) and HDFS (Hadoop’s data file system) because they are really easy to use, so installing Hadoop is a must.
To install Hadoop, download here: https://hadoop.apache.org/releases.html. Here I selected 3.2.2 version.
Then unpack the package and move it to your preferred folder:
$ tar -zxvf hadoop-3.2.2.tar.gz
$ mv hadoop-3.2.2.tar.gz /usr/local/hadoop/
Then you need to modify your bash configuration file (~/.bashrc or ~/.bash_profile or ~/.zshrc) and add Hadoop to your PATH:
export HADOOP_HOME=/usr/local/hadoop/hadoop-3.2.2/
export HADOOP_PREFIX=$HADOOP_HOME
export PATH=$HADOOP_HOME/bin:$HADOOP_HOME/sbin:$PATH
export HADOOP_CONF_DIR=$HADOOP_HOME/etc/hadoop
Then run the configuration file again to make it work:
$ source ~/.bashrc
Now you can run Hadoop in your machine! Go to /usr/local/hadoop/hadoop-3.2.2/bin and run:
$ hadoop version
If you see the below result, it means hadoop is successfully installed!

Configuration
1. Configure Hadoop distributed mode (HDFS and YARN setup)
1.1 SSH authentication setup
First you need to make sure you have Java in your machine by following the steps in “Installation”. Then we need to set up the distributed authentication key-pairs so that the master node can easily connect to worker nodes. Install SSH on your machine with:
$ sudo apt install openssh-client
$ sudo apt install openssh-server
Then generate a public ssh-key on each node with:
$ ssh-keygen -t rsa -P ''
Afterwards send the public key to each machine in the cluster:
$ cat ~/.ssh/id_dsa.pub >> ~/.ssh/autorized_keys
Run ssh localhost to check if you still log-in key. If you see below, your SSH setup is done!

1.2 NameNode location setup
Update your /hadoop/etc/hadoop/core-site.xml to set up NameNode location:
<configuration>
    <!-- specify communication address for namenode>
    <property>
        <name>fs.defaultFS</name>
        <value>hdfs://localhost:9000</value>
        <description>The name of the default file system.</description>
    </property>
    <!-- specify storage directory of temorary files generated during Hadoop run>
    <property>
        <name>hadoop.tmp.dir</name>
        <value>file:/usr/local/hadoop/hadoop-3.2.2/tmp</value>
        <description>A base for other temporary directories.</description>
    </property>
</configuration>
1.3 HDFS path setup
Update your hadoop/etc/hadoop/hdfs-site.xml to set up HDFS path:
<configuration>
    <!-- specify how many times data is replicated in the cluster>
    <property>
        <name>dfs.replication</name>
        <value>1</value>
    </property>
    <property>
        <name>dfs.namenode.name.dir</name>
        <value>file:/usr/local/hadoop/hadoop-3.2.2/tmp/dfs/name</value>
    </property>
    <property>
        <name>dfs.namenode.data.dir</name>
        <value>file:/usr/local/hadoop/hadoop-3.2.2/tmp/dfs/data</value>
    </property>
</configuration>
1.4 Configure YARN
First, edit hadoop/etc/hadoop/mapred-site.xml to set YARN as the default framework for MapReduce operations:
<configuration>
    <property>
        <name>mapreduce.framework.name</name>
        <value>yarn</value>
    </property>
    <property>
        <name>yarn.app.mapreduce.am.env</name>
        <value>HADOOP_MAPRED_HOME=$HADOOP_HOME</value>
    </property>
    <property>
        <name>mapreduce.map.env</name>
        <value>HADOOP_MAPRED_HOME=$HADOOP_HOME</value>
    </property>
    <property>
        <name>mapreduce.reduce.env</name>
        <value>HADOOP_MAPRED_HOME=$HADOOP_HOME</value>
    </property>
</configuration>
Then, edit hadoop/etc/hadoop/yarn-site.xml:
<property>
        <name>yarn.nodemanager.aux-services</name>
        <value>mapreduce_shuffle</value>
    </property>

    <property>
        <name>yarn.nodemanager.aux-services.mapreduce.shuffle.class</name>
        <value>org.apache.hadoop.mapred.ShuffleHandler</value>
</property>
1.5 Format HDFS
After the setup, you need to format HDFS by running:
$ hadoop namenode -format
If you see below, the formatting is done!

1.6 Run HDFS and YARN
Now you can run HDFS and YARN services! Go to /usr/local/hadoop/hadoop-3.2.2/bin and run:
$ start-all.sh
Use jps command to see if HDFS and YARN are successfully running:

After all you jobs are finished, you can terminate hadoop service by going to /usr/local/hadoop/hadoop-3.2.2/bin and run:
$ stop-all.sh
2. Create and run Scala code in IDEA
2.1 Create new Scala project
As I mentioned earlier, IDEA is a very popular IDE for Scala. One reason for that is that it’s super easy to set up the development environment for Scala projects with IDEA. Here is how:
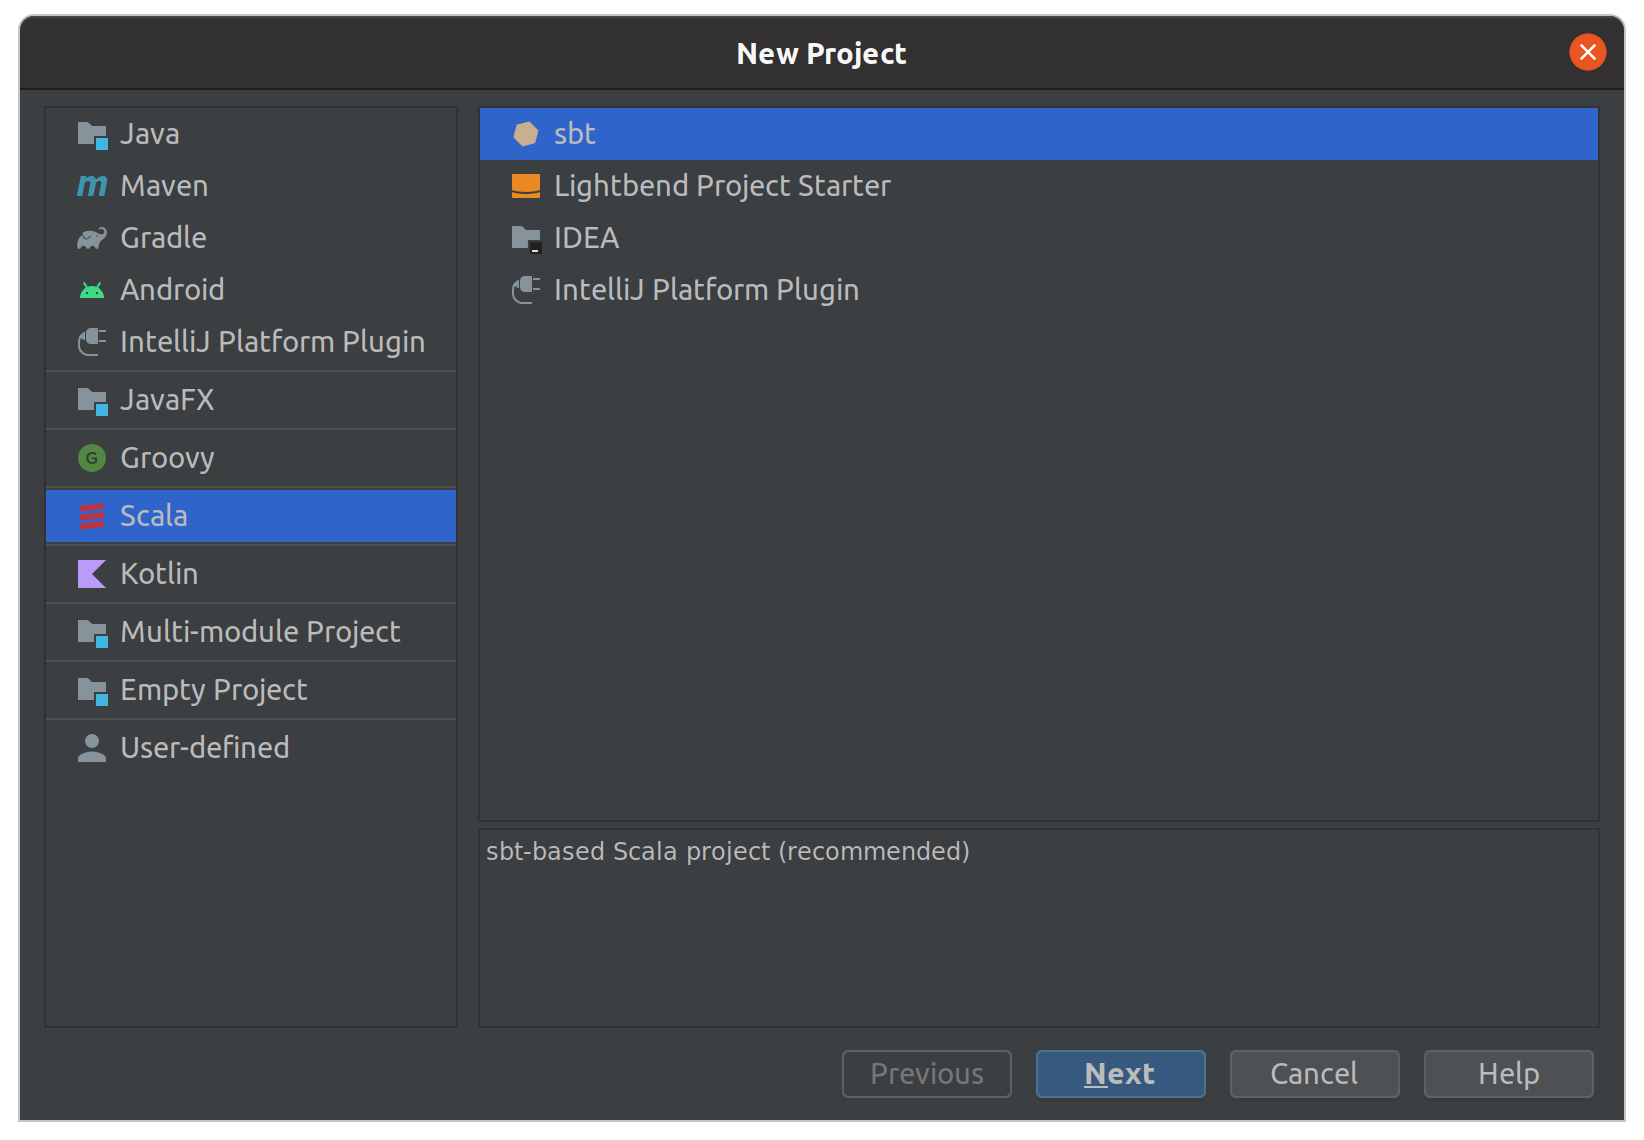
First, open IntelliJ IDEA once you downloaded it. Click File -> New -> Project. Select Scala -> sbt and click Next:
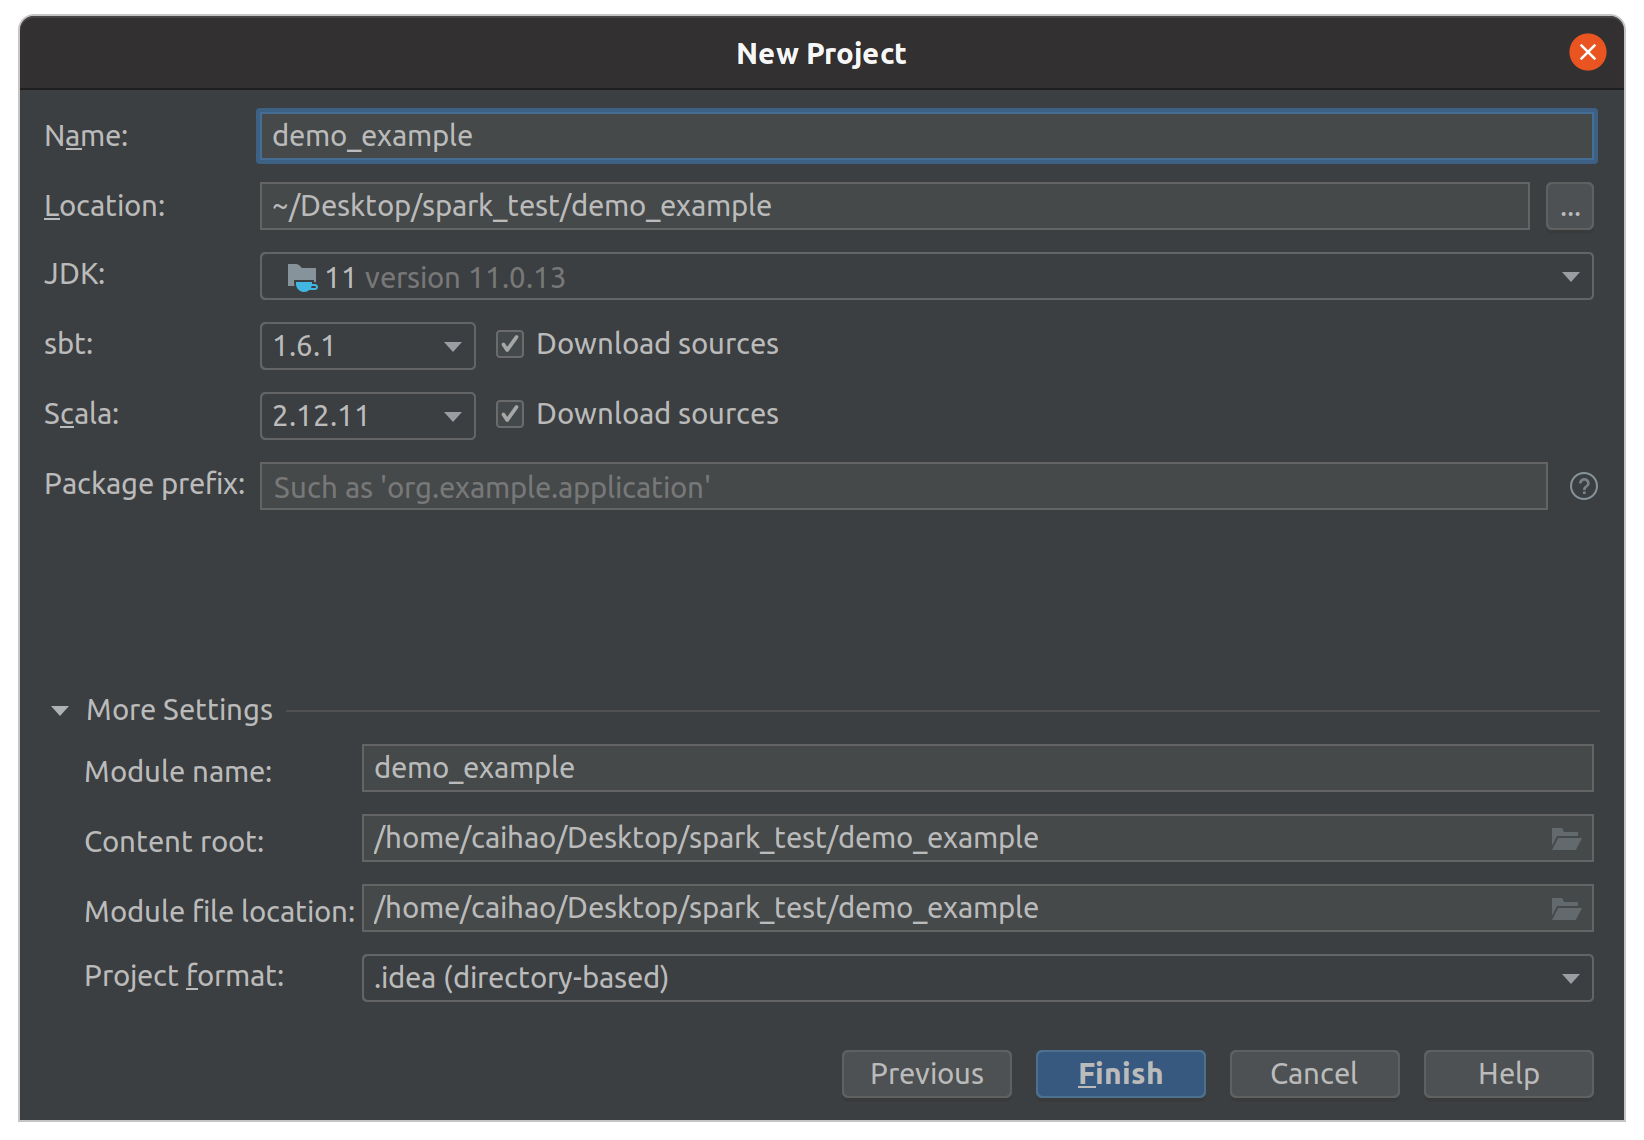
Then, name your project and select the correct JDK, SBT and Scala versions. Make sure the versions are consistent with what we installed earlier!
Then click Finish and you will see the project view:
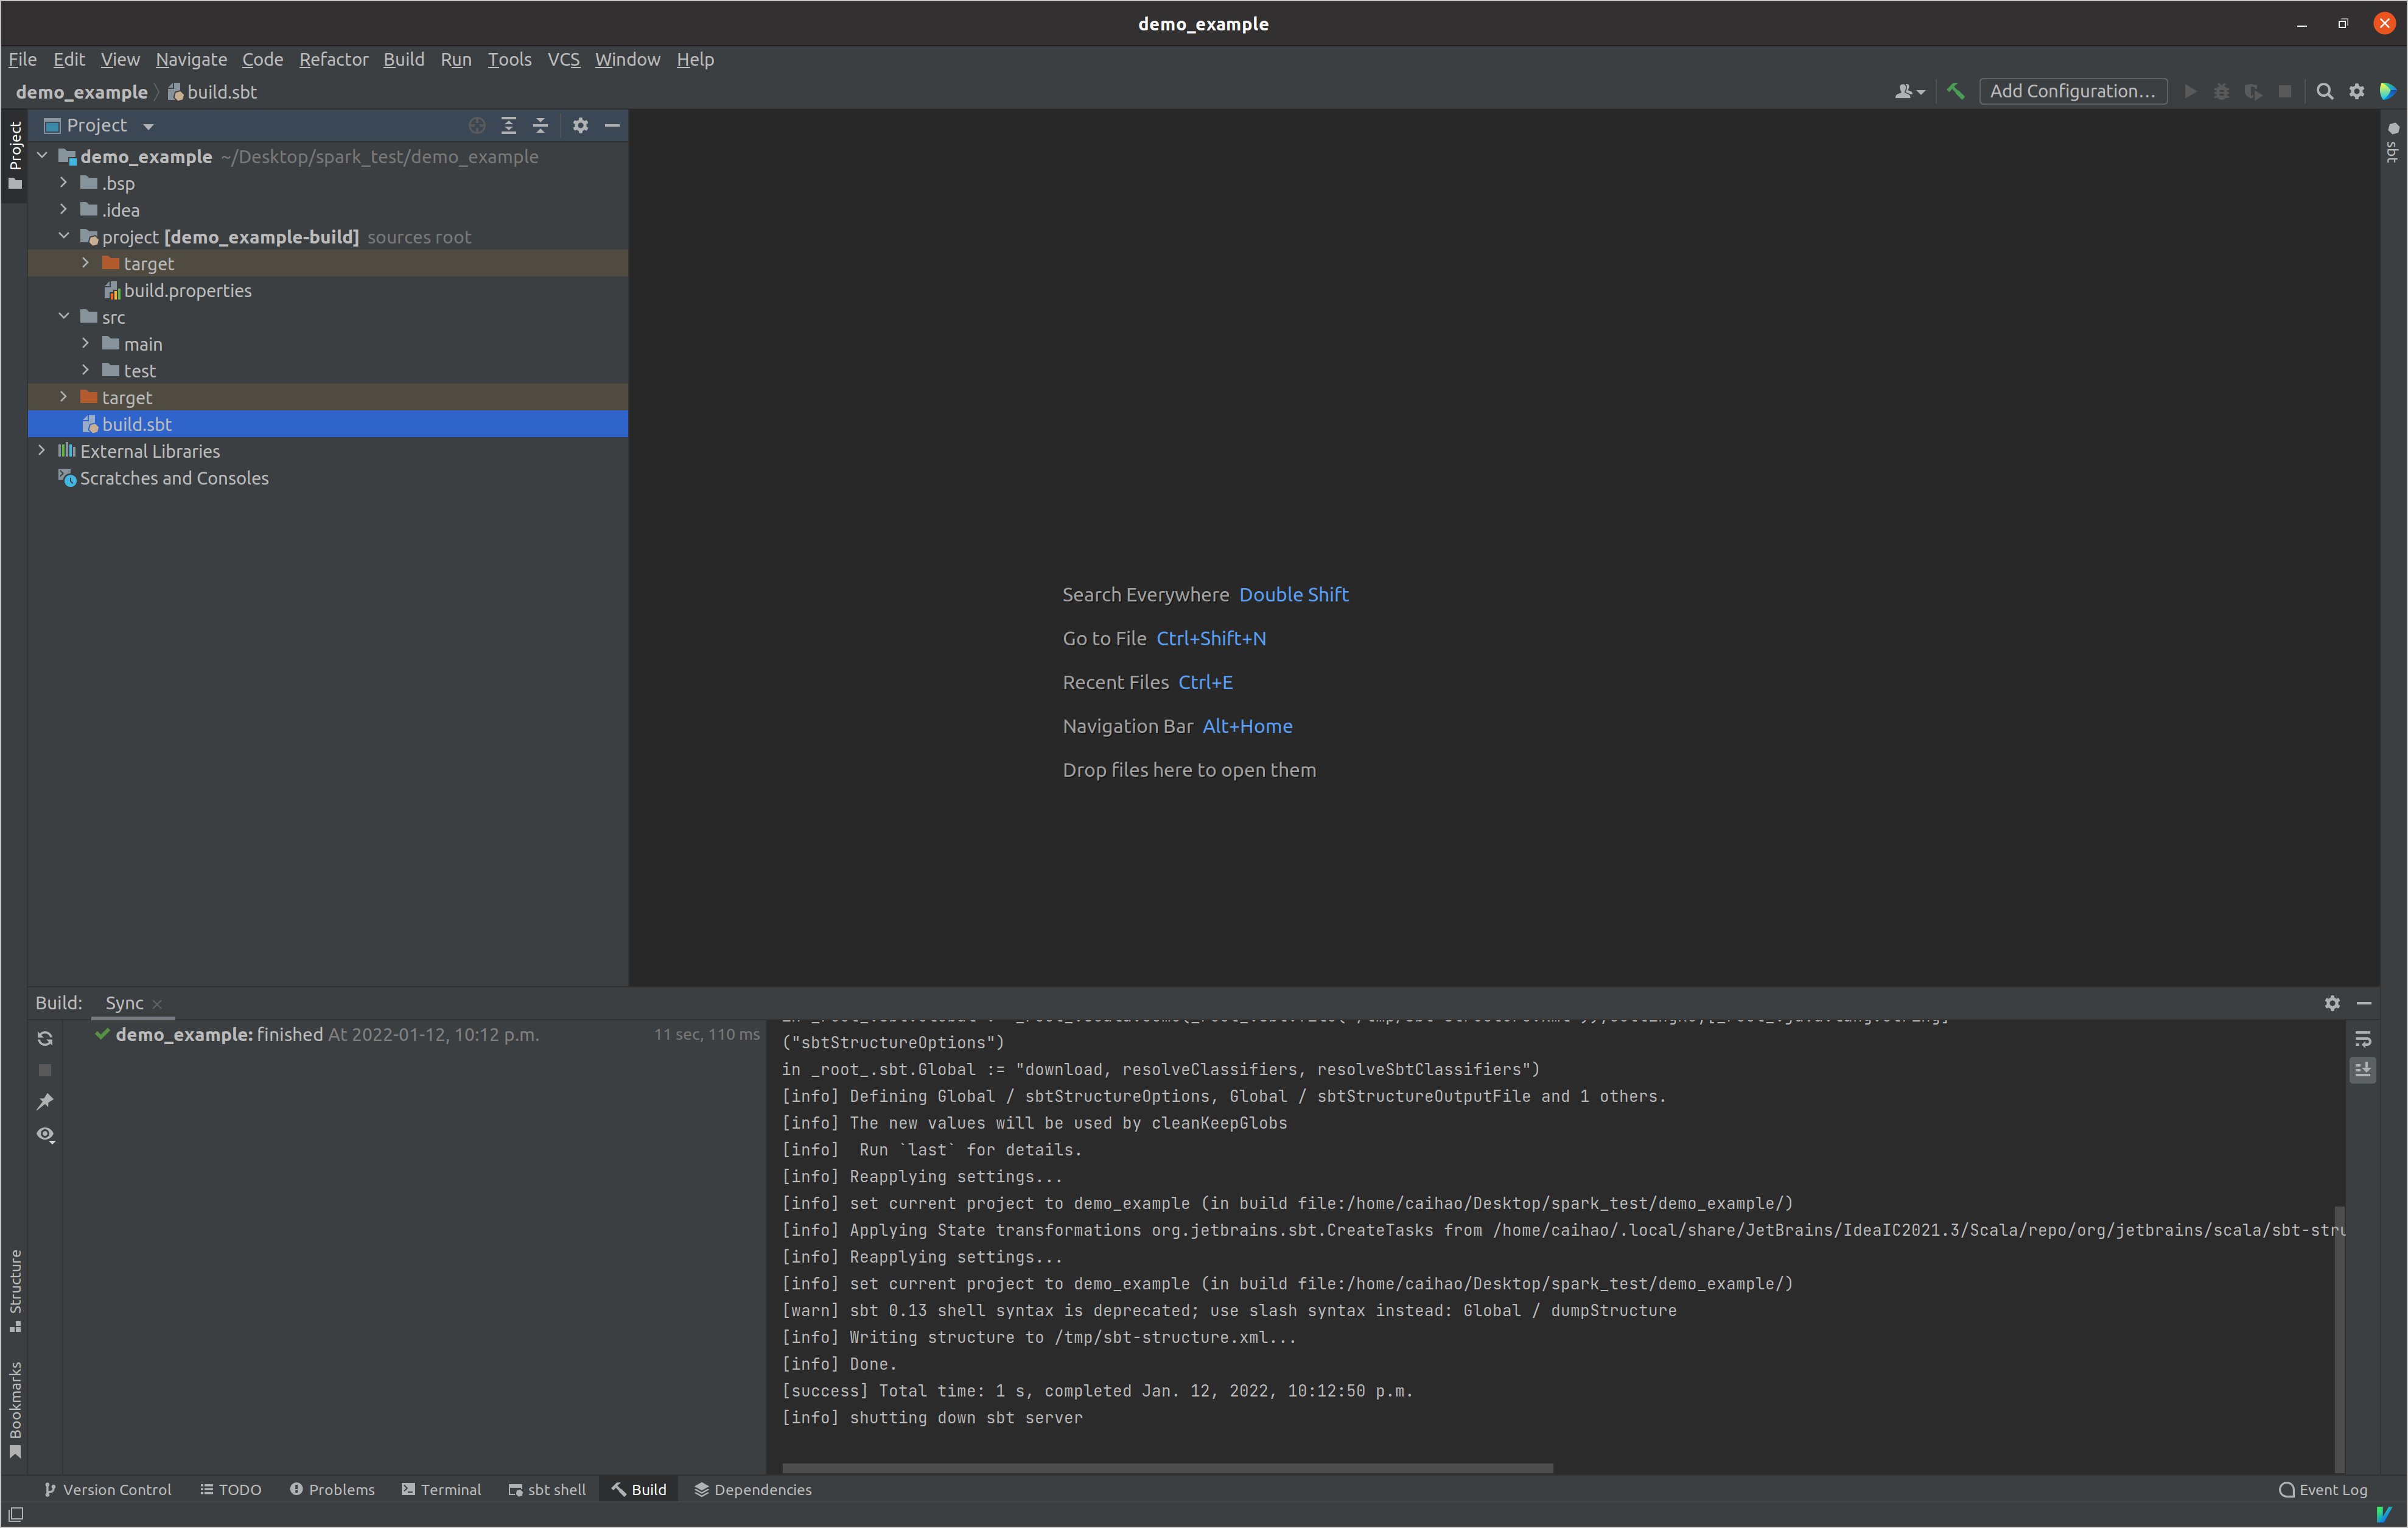
Open the build.sbt file and modify it as below:
name := "demo_example"

scalaVersion := "2.12.11"

version := "1.0"

libraryDependencies += "org.scala-lang.modules" %% "scala-parser-combinators" % "1.1.2"
libraryDependencies += "org.apache.spark" %% "spark-core" % "3.2.0"
libraryDependencies += "org.apache.spark" %% "spark-mllib" % "3.2.0"
libraryDependencies += "org.apache.spark" %% "spark-sql" % "3.2.0"
libraryDependencies += "org.apache.spark" %% "spark-hive" % "3.2.0"
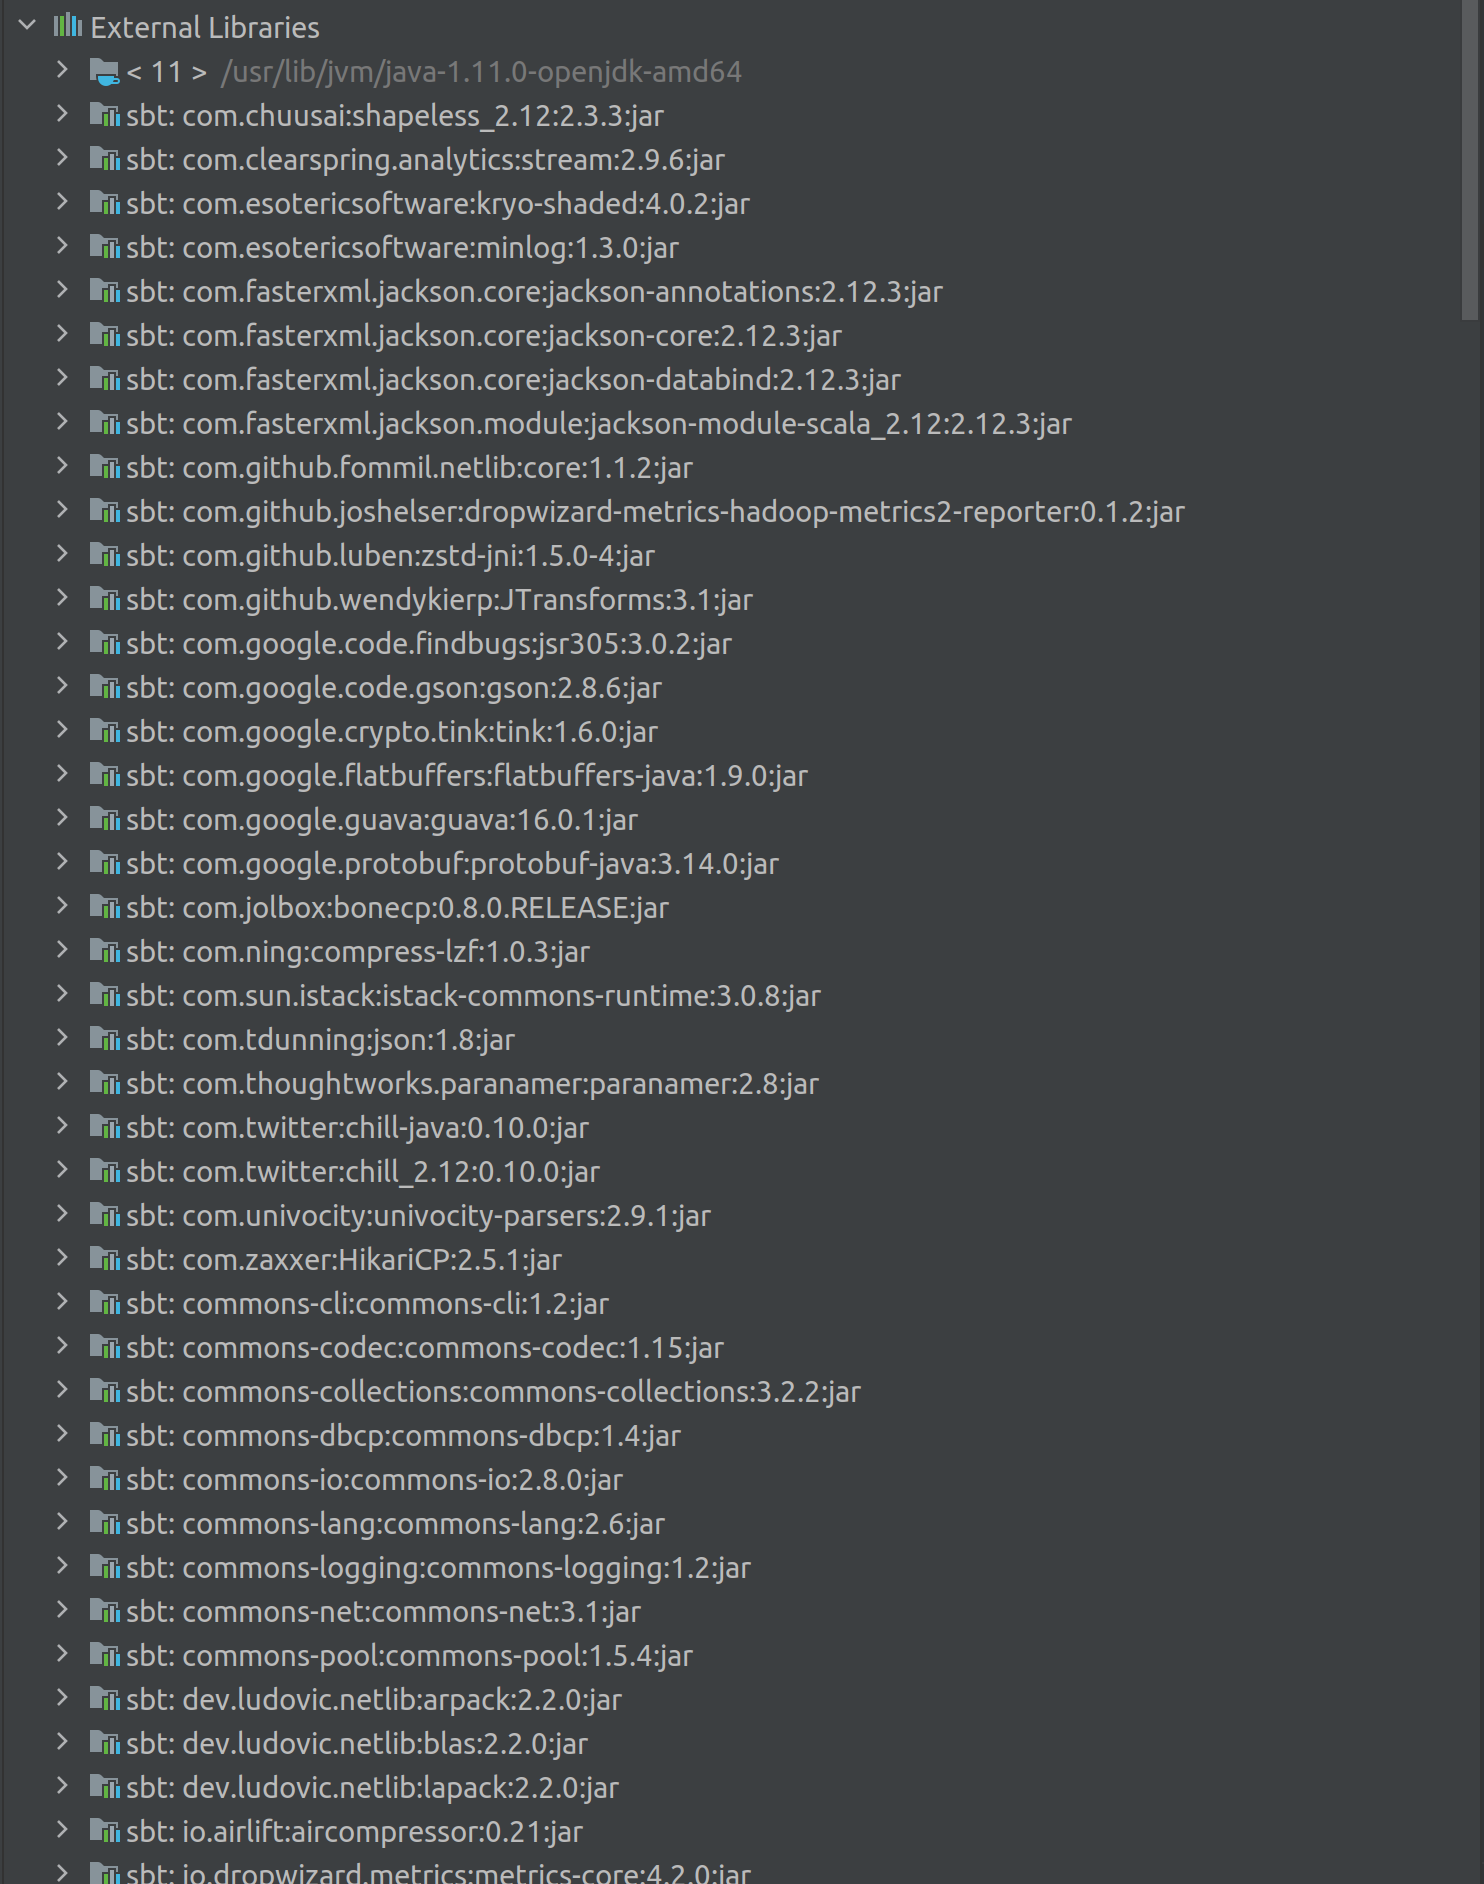
The final four lines add Spark packages as your Scala dependencies. Once your edit is saved, You’ll see three options, Refresh Project, Enable Auto-Import and Ignore. Click on Enable Auto-Import so that IDEA starts to download the dependencies. It will also build your project every time changes are made to build.sbt. Once that is done you will see all the spark dependencies in the external libraries on the left pane.
2.2 Create and run example Scala/Spark script
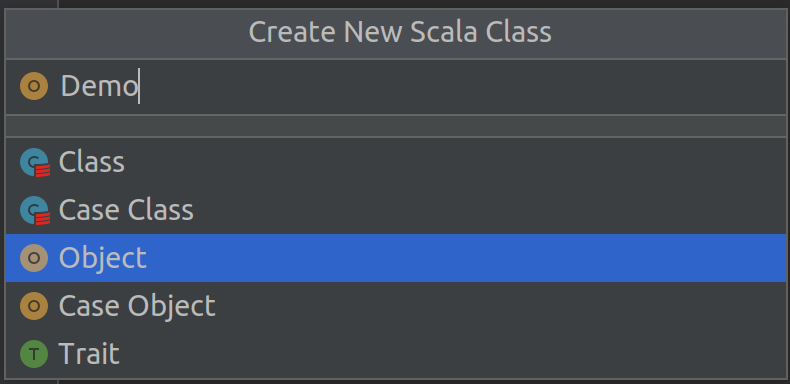
Now we can write some Scala code in this project. Go to src -> main -> scala directory on the left pane, right click and select New -> Scala Class, then select Object and enter class name as Demo, click OK.
Add following code to Demo.scala file:
import org.apache.spark.rdd.RDD
import org.apache.spark.{SparkConf, SparkContext}

object Demo {
  def main(args: Array[String]) = {
      val sparkConf: SparkConf = new SparkConf().setMaster("local").setAppName("WordCount")
      val sc = new SparkContext(sparkConf)

      // 1. read file, get data by line
      val lines: RDD[String] = sc.parallelize(Array("Hello World Jack", "Hello World Luna", "Hello World Jack"))

    // 2. break each line to words
      val words: RDD[String] = lines.flatMap(_.split(" "))

      // 3. split data based on words
      val wordGroup: RDD[(String, Iterable[String])] = words.groupBy(word => word)

      // 4. convert data after splitting
      val wordToCount = wordGroup.map {
        case (word, list) => {
          (word, list.size)
        }
      }

      // 5. collect the results and print
      val array: Array[(String, Int)] = wordToCount.collect()
      array.foreach(println)

      // close connection
      sc.stop()
  }
}
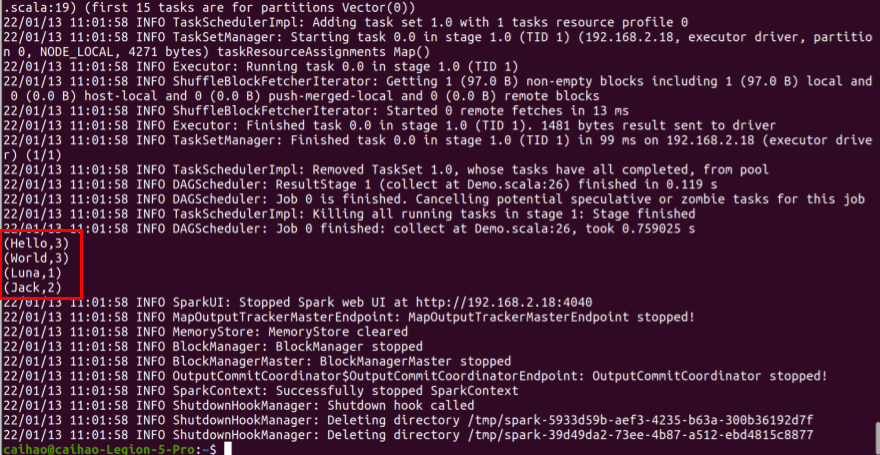
What this piece of code does is a word count of three sentences: “Hello World Jack”, “Hello World Luna”, “Hello World Jack”, and print out the results on console. You can run it by right click and click Run ‘Demo’. After a few logs from Spark, you should see the output.
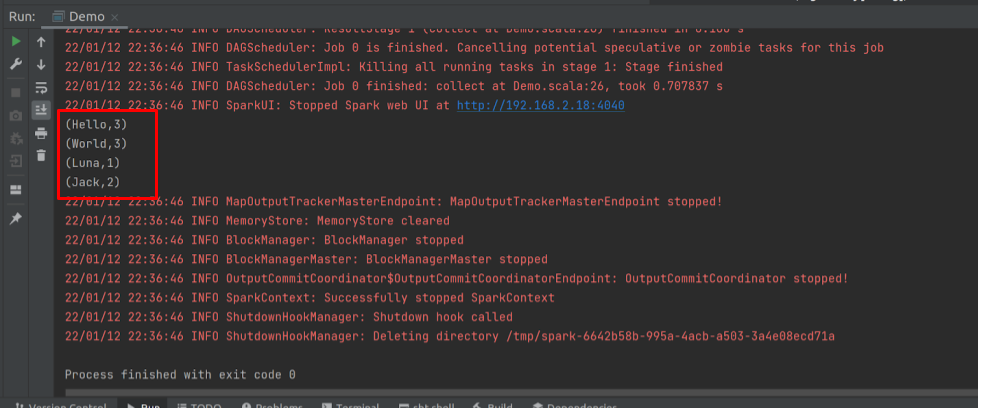
And that’s it! Now you have your first Spark program running!
2.3 Package Scala script to jar file
In order to submit Spark jobs written in Scala, you have to package your Scala code to an executable Jar file. Here is how to do it with our word-count example.
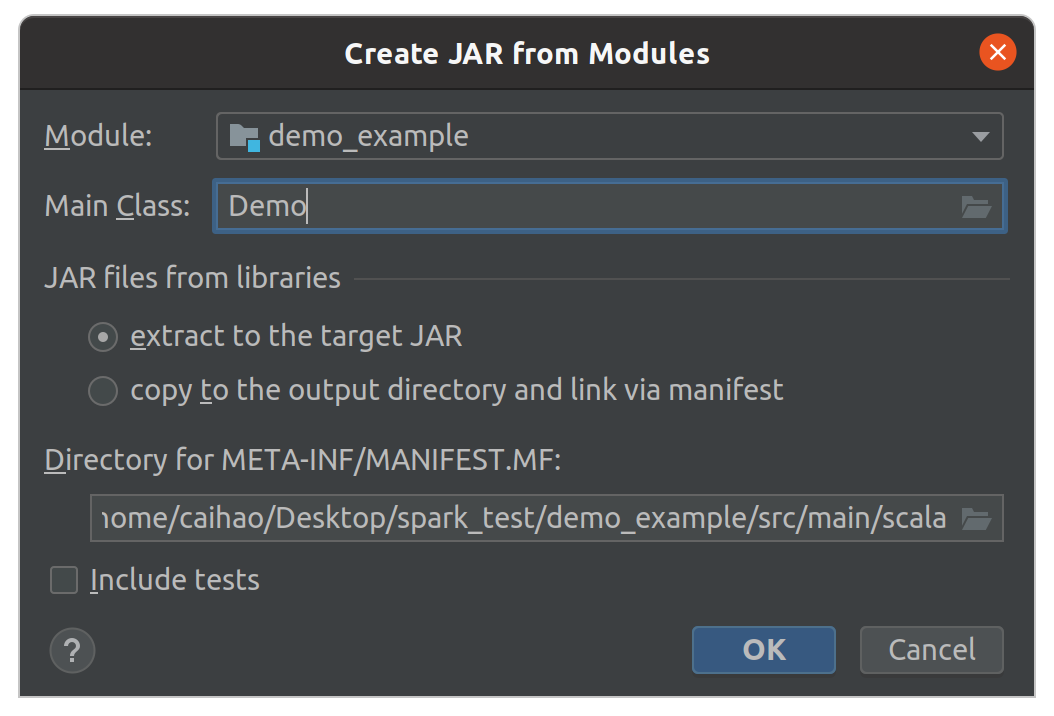
Click File -> Project Structure -> Artifacts -> + -> JAR -> From modules with dependencies.
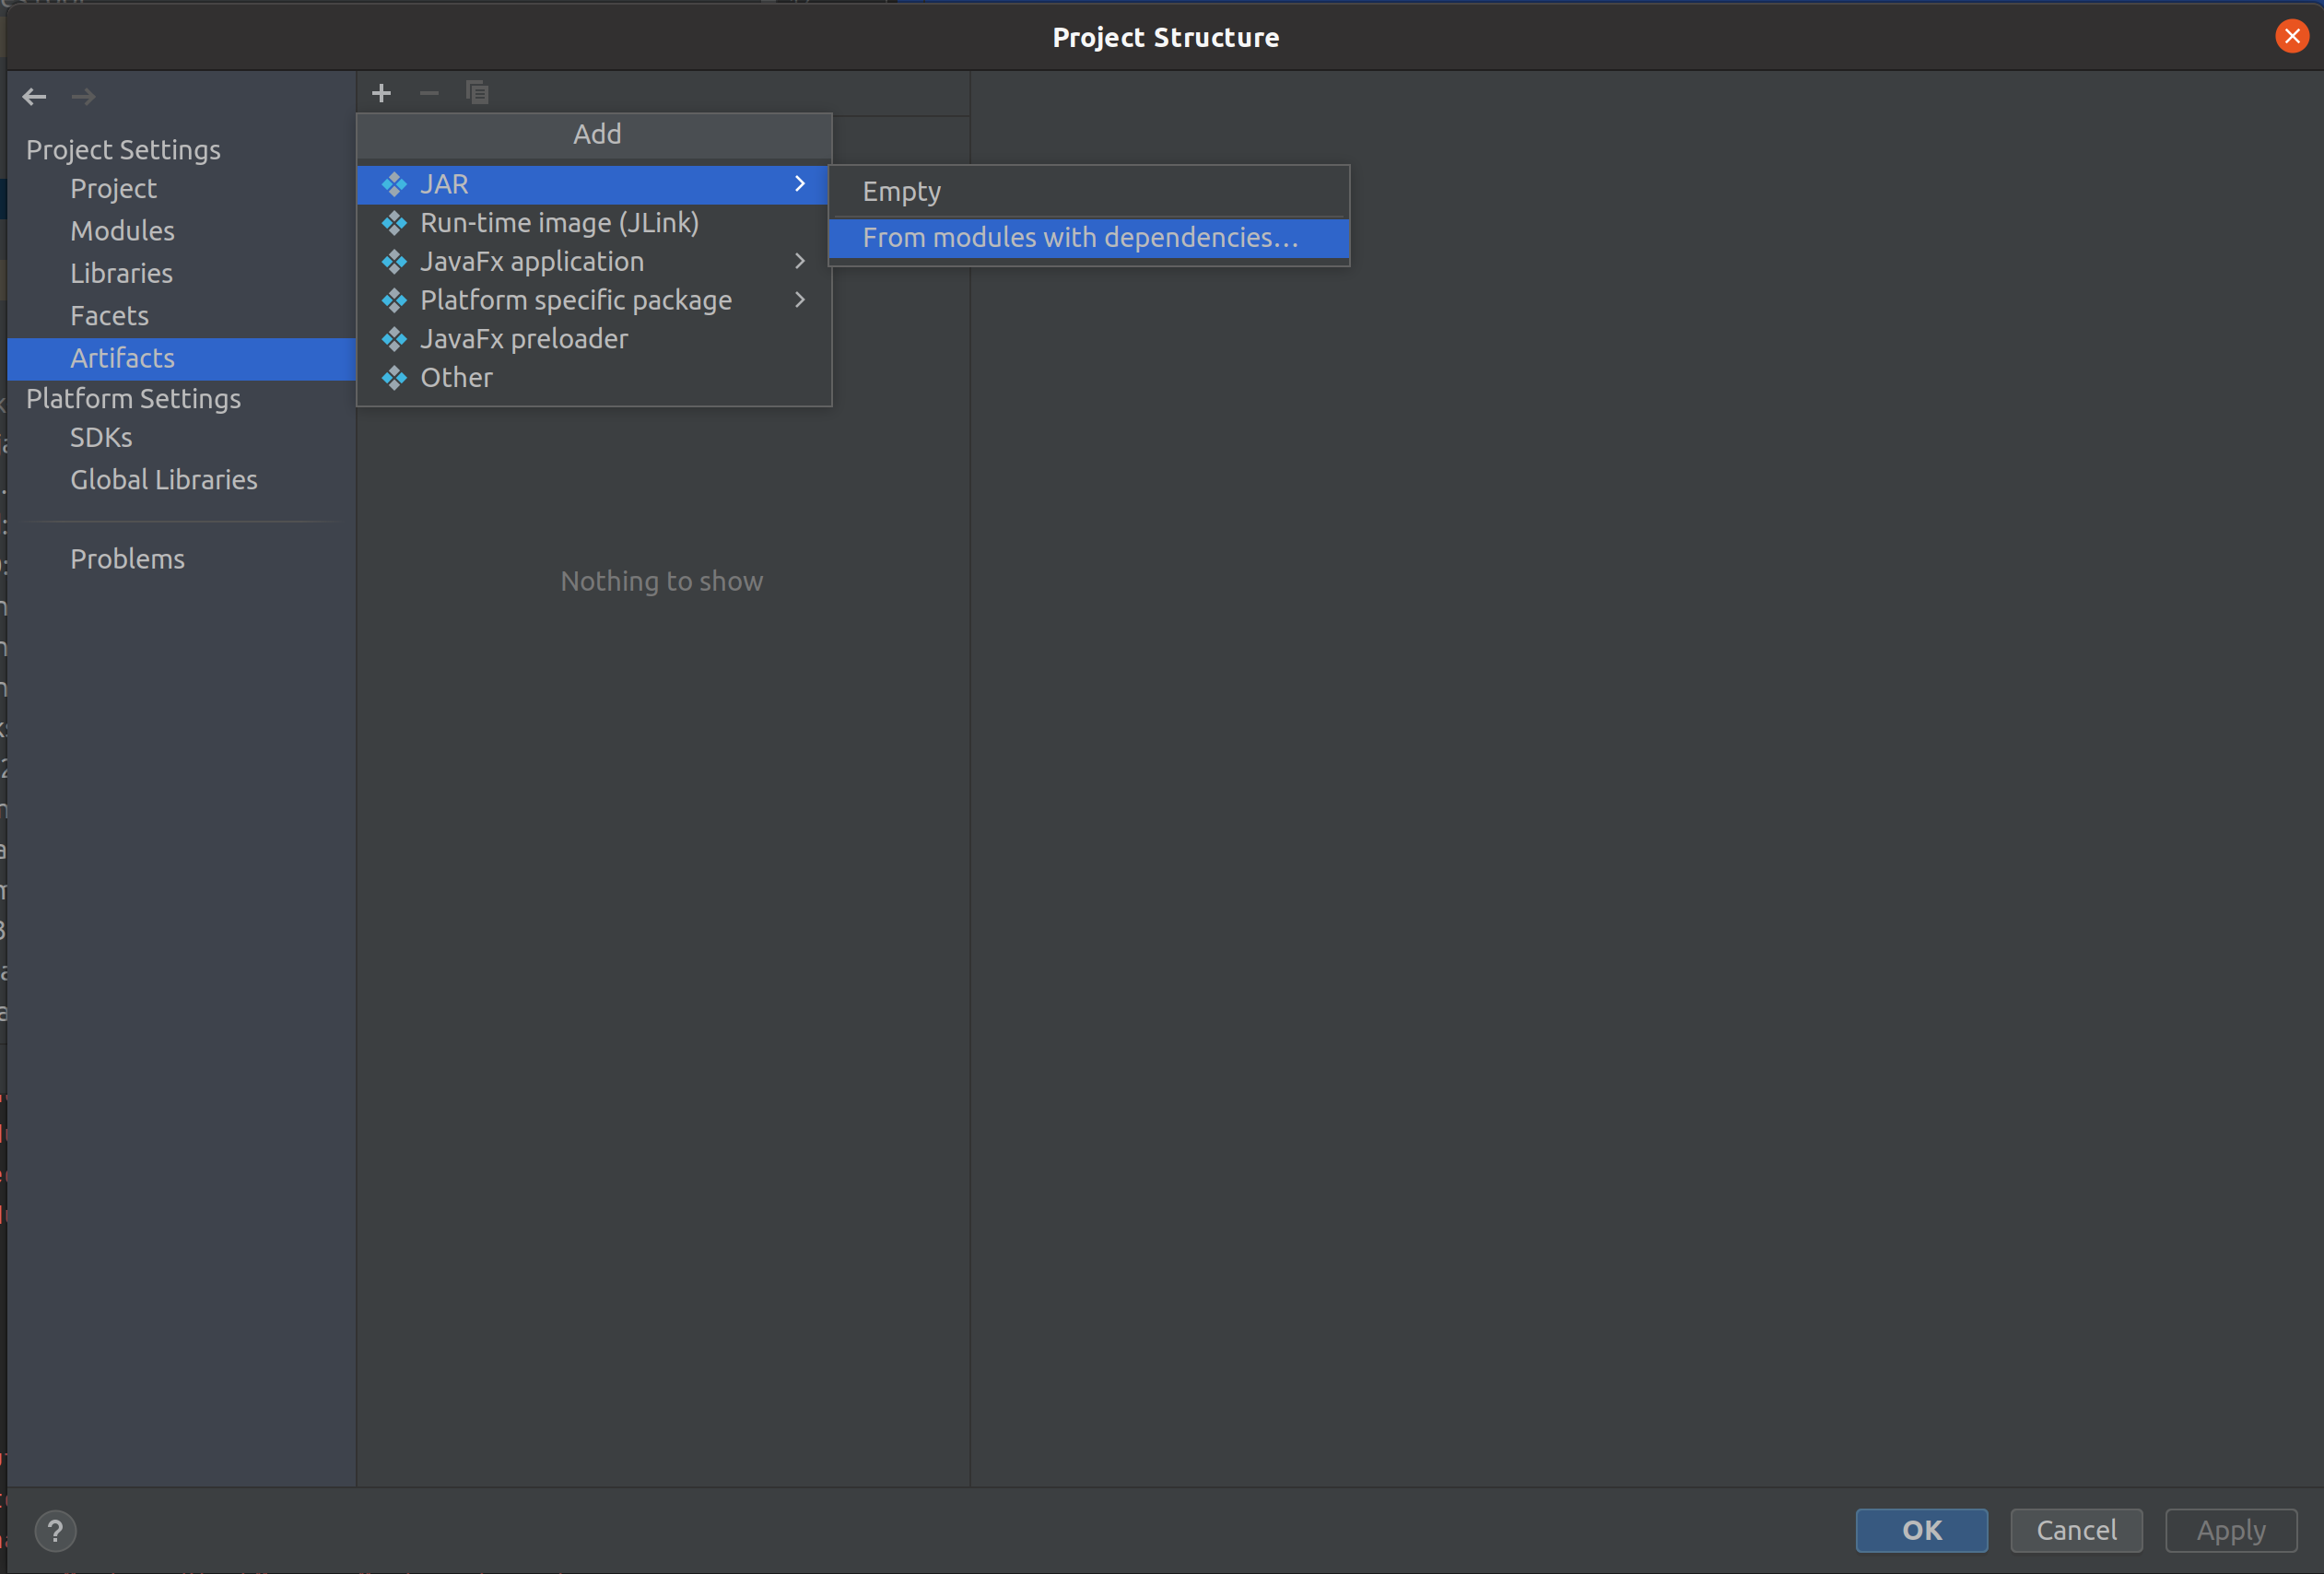
Select Module: demo_example and Main Class: Demo, click OK.
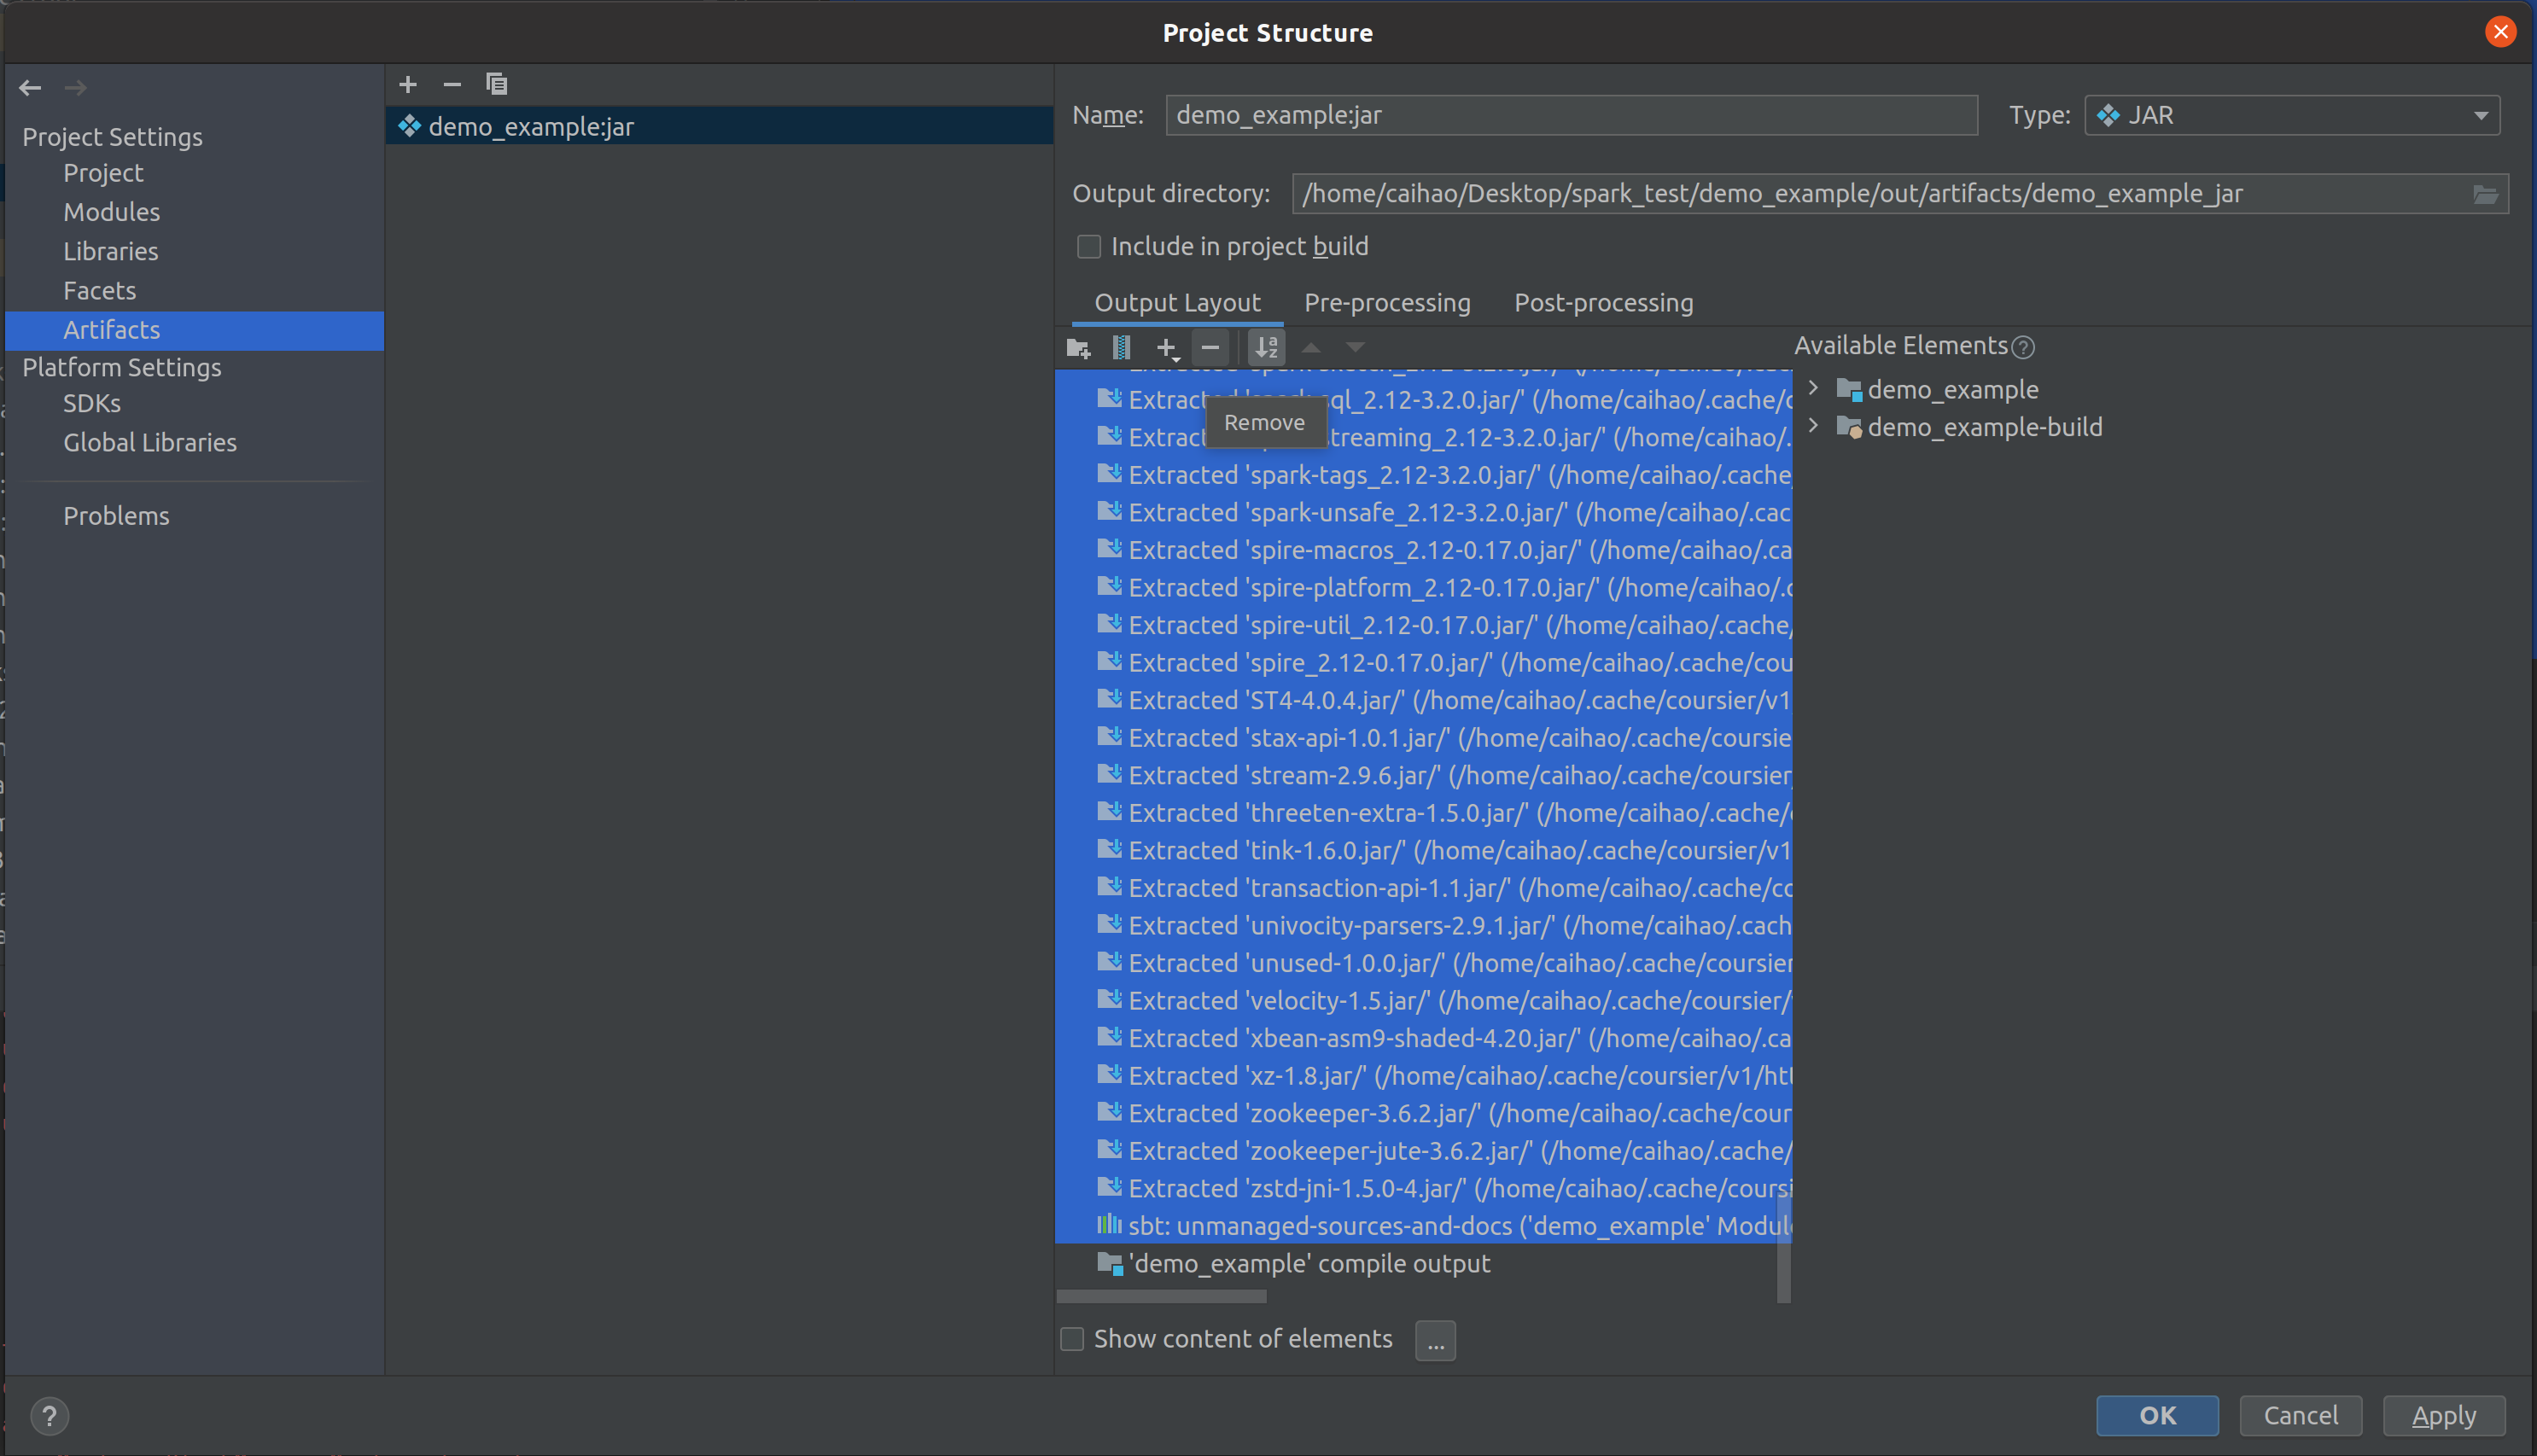
Then, remove external lib package support in Output Layout and only keep ‘demo_example’ compile output. Click OK.
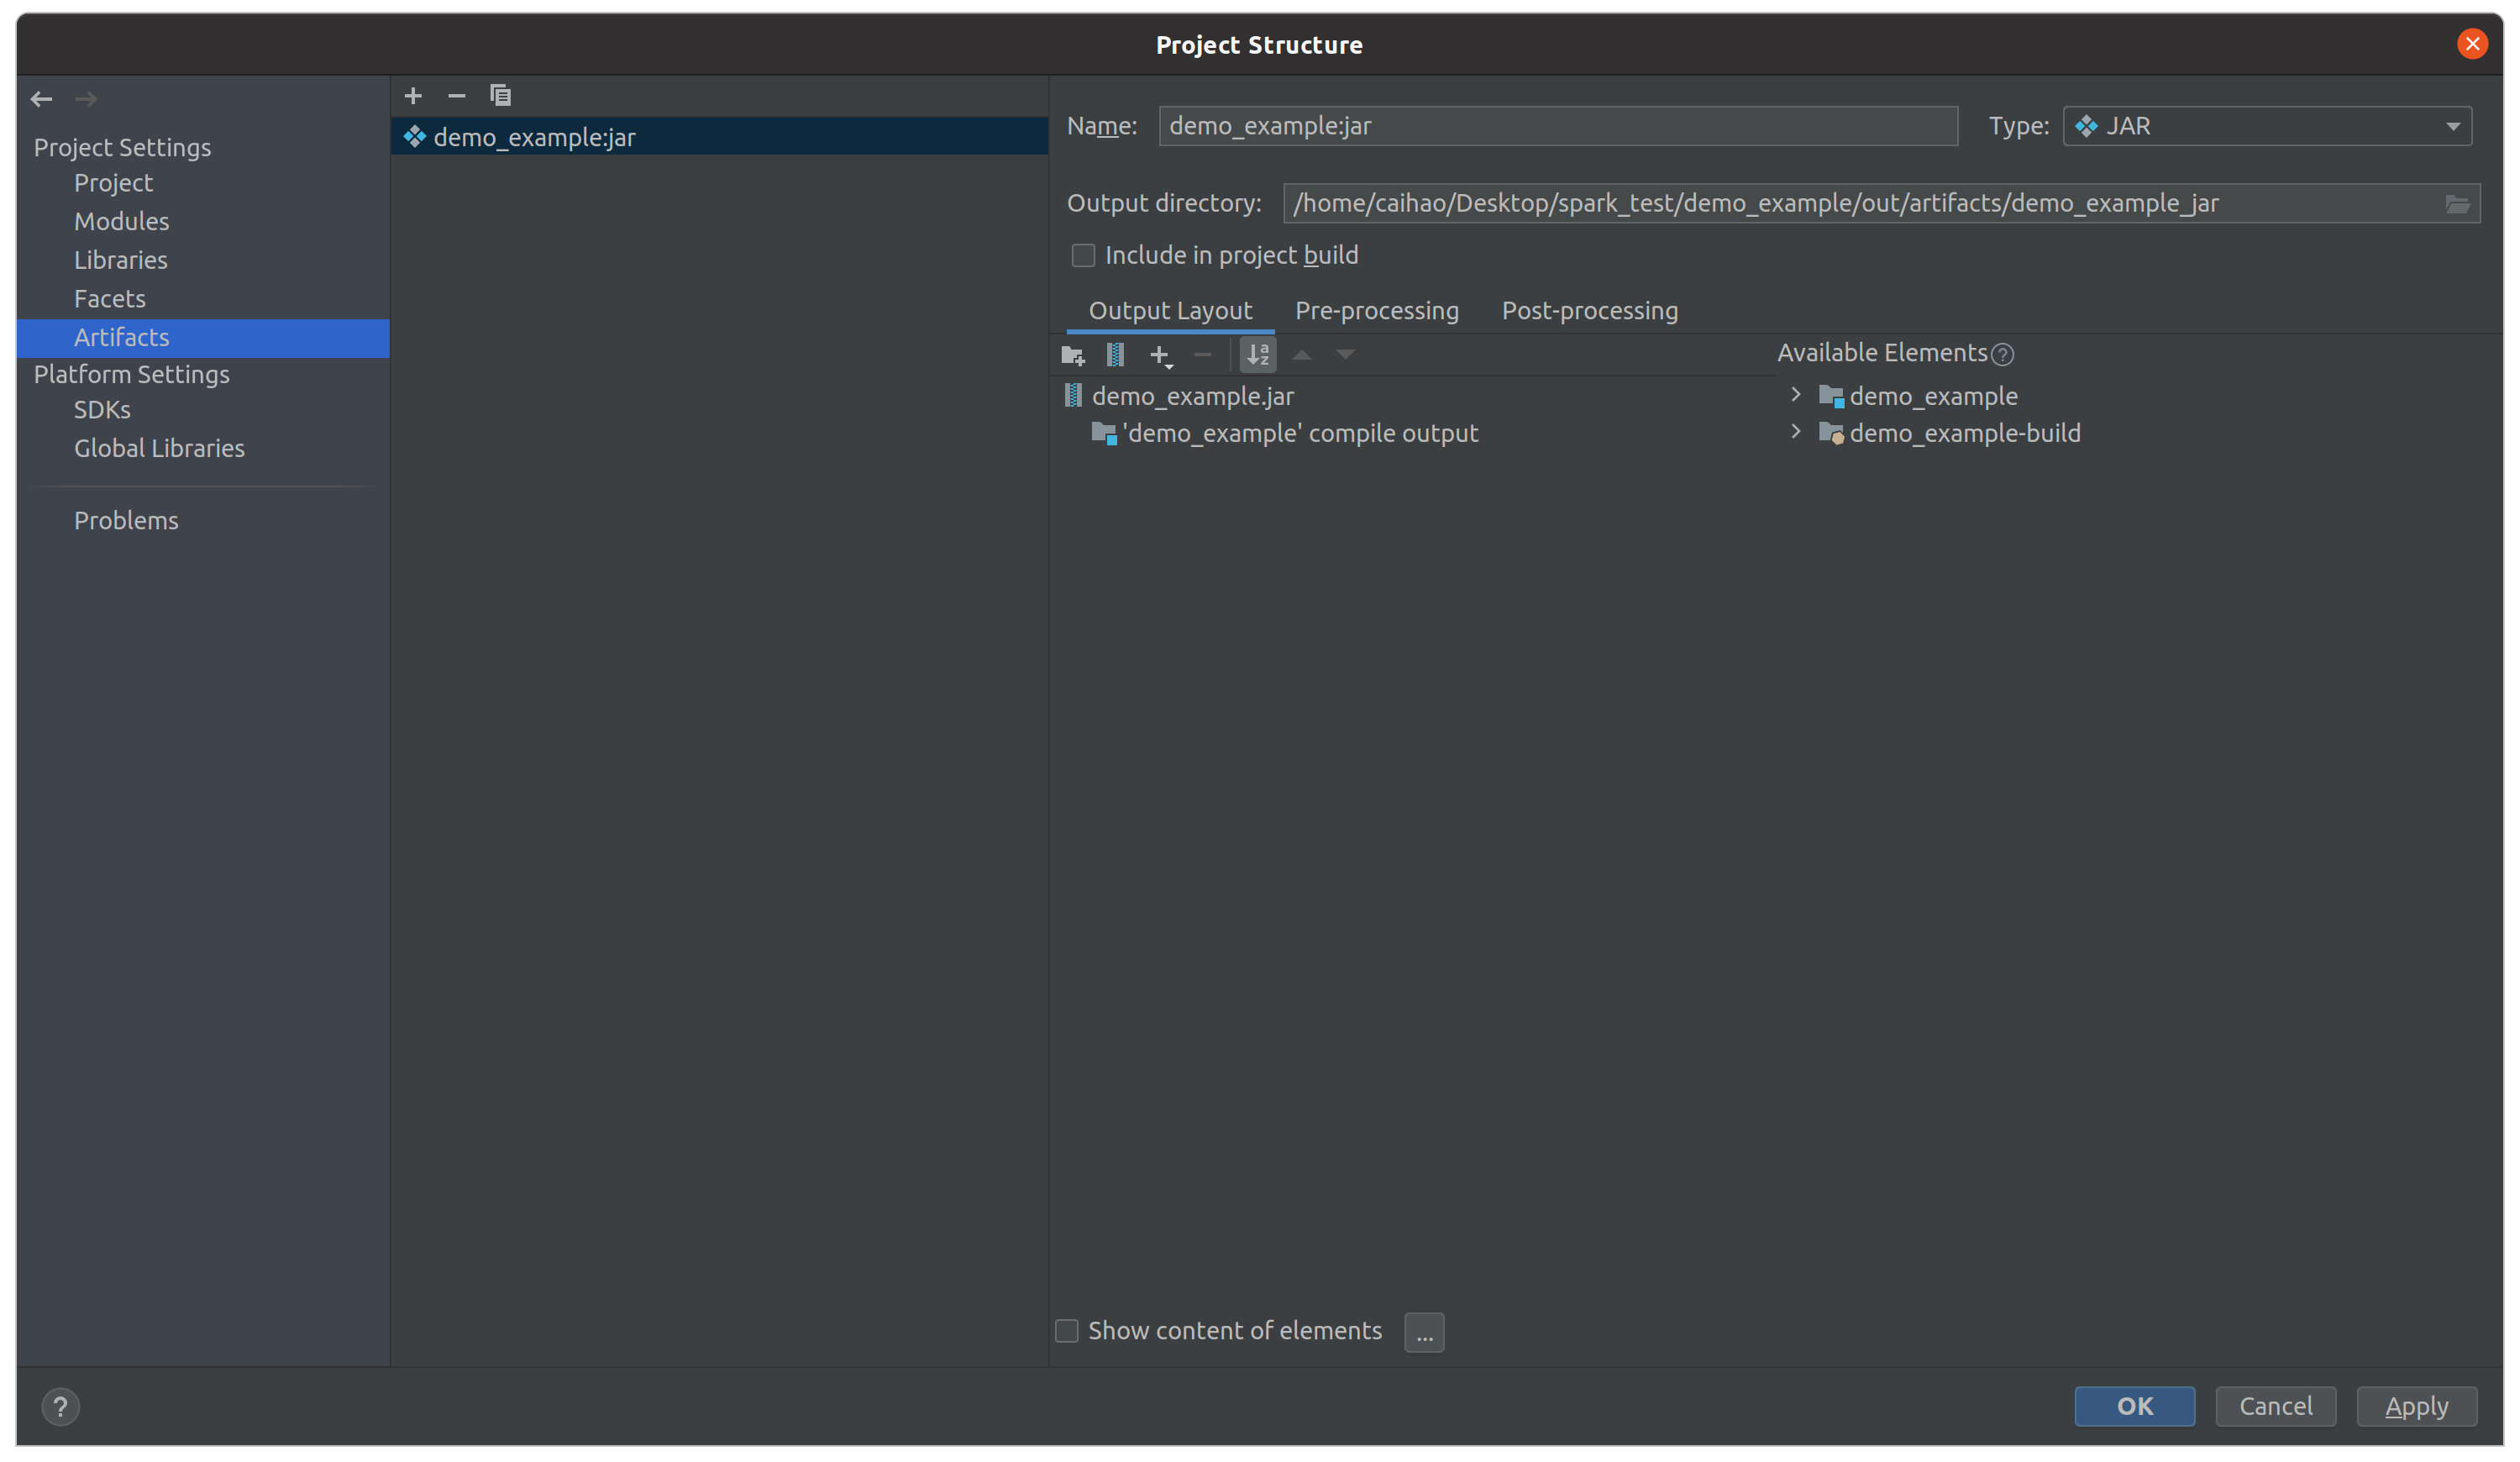
Finally, compile and generate Jar file by clicking Build -> Build Artifacts -> demo_example:jar -> Build. You will see a demo_example.jar file in out/artifacts/demo_example_jar/ on the left panel. This is your Jar file!
Now you can submit this jar file to Spark and see it running:
spark-submit --class Demo --master local your/path/to/demo_example.jar
If you see below, it means you just successfully packaged and submit your Scala application to Spark.
Congratulations! You just set up your environment for Spark. Now you can write any Spark application and run them in a cluster. Happy coding!